
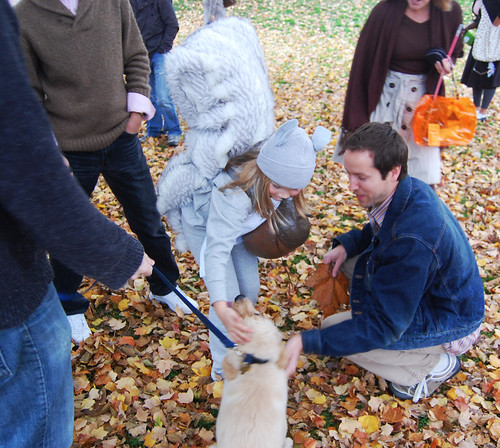
HAPPY HALLOWEEN, everyone! Be safe and eat lots of candy (preferably Reese’s PB Cups and mini Snickers).

We didn’t get Biscuit into his costume, but I think the crowds enjoyed him anyway!


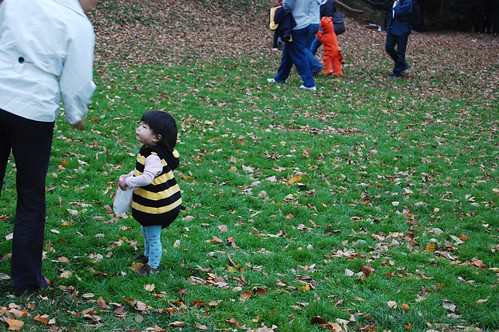

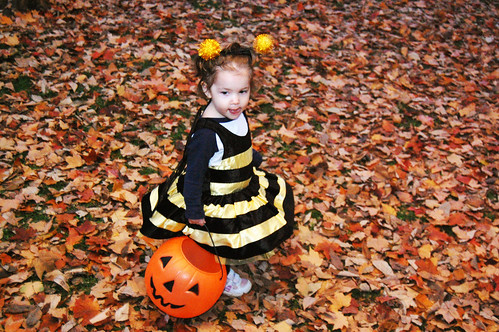
HAPPY HALLOWEEN, everyone! Be safe and eat lots of candy (preferably Reese’s PB Cups and mini Snickers).
We didn’t get Biscuit into his costume, but I think the crowds enjoyed him anyway!
I don’t know why I haven’t figured this out before, but it’s really going to be a life saver for me this year.
Every fall a bunch of cooking magazines come out with articles that boast new ideas for pumpkin pie. I get pretty excited about this because I love pumpkin pie, but then I also feel torn because what if I make it for the holidays and it’s not that good? Then I have bad pie plus no traditional pumpkin pie. And there’s just no way I have time to make full pies with crust before the holidays in addition to making the real thing.
Well, why don’t we eliminate the crust. It’s the most time consuming part and can also be the most variable. The pie filling is really the thing we want to test anyway.
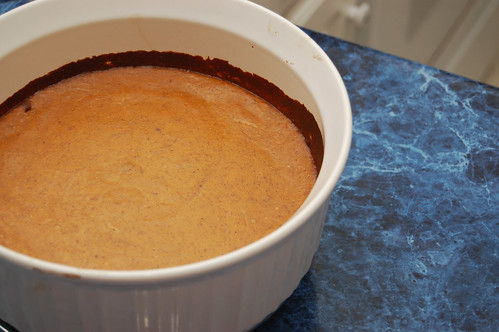
If you have Corningware, and I really hope you do, you can combine all your ingredients, refrigerate it overnight if you don’t have time to bake it then and then the next day put the dish in the oven to bake. You can even serve it in Corningware.
Baking it in a dish instead of crust allows you to try more recipes faster so that you can plan ahead. It’s also a spectacular way to cut out calories. Pumpkin pie filling doesn’t have to be ridiculously fattening, but good crust usually does –
TheCalorieCounter.com lists one slice of crust only that has been prepared from a recipe contains 121 calories and 8 grams of fat. A whole 9″ pie crust contains about 949 calories and 62 grams of fat.
Yeah…
Enjoy more pumpkin pie filling varieties, save your favorite pair of pants!
I thought today’s recipe would be pretty sweet since it uses sweetened condensed milk instead of evaporated milk, however it really wasn’t that sweet. It is spicy, however. If you can’t get enough of pumpkin pie spice, then you’ll definitely enjoy this variety.
1 15 oz. can pumpkin puree
1 12 oz. can of sweetened condensed milk, not evaporated
1 large egg
1/2 teaspoon nutmeg
1/4 teaspoon ginger
3/4 teaspoon cinnamon
dash of cloves
Blend ingredients together and pour into large Corningware dish. Bake at 375F for 45-50 minutes or until cooked. Cool and refrigerate before serving.
This past weekend I went to a very lovely wedding in Richmond. The flowers were gorgeous, the bride’s dress was amazing, and one of the first things to catch my eye were two pumpkins being used as beer coolers on the bar.
Now that’s amazing. If you’re planning a Halloween party or, hey, hosting Thanksgiving this year, you must have these! Things like this make me wish I’d had a fall wedding.
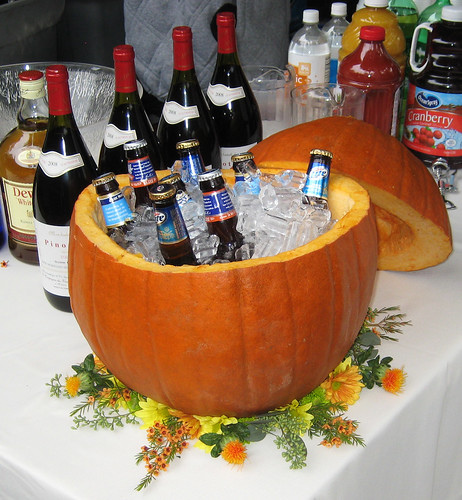
Of course Martha Stewart has also thought of this very cool use for pumpkins. On her site she instructs:
Just choose a large, wide pumpkin, cut off the top third with a serrated knife or keyhole saw, and scrape out the pulp and seeds. Line the gourd with a glass or plastic bowl to prevent it from becoming water-logged. If the pumpkin opening is a bit too small for the bowl, carefully shave the inside edge with a spoon. Finish by filling the bowl with ice and bottled drinks.
I didn’t notice a glass bowl inside the pumpkin cooler at the wedding, so maybe you could get away with not using it. Especially if you’re using the pumpkin coolers outdoors, the cold air will keep any ice from melting and water-logging the pumpkin.
If you saw our tips two weeks ago on preserving jack-‘o-lanterns, then you read that pumpkins like to be nice and cold.
Good luck – and please send us photos if you pull it off!
I came up with my costume for halloween! I have decided on Inspector Gadget. I must say I’m quite proud of my stroke of genius. Costumes from your past really are the way to go, if you ask me. I went as the chef from the Muppets a few years back and it was a blast. Of course, last year’s Calvin (Calvin & Hobbes) was not so successful, but I attribute that largely to the fact that my hair wasn’t yellow so much as it was green. Curses!
Work has been crazy these past few weeks. I started a new project which I really enjoy (for the most part) but right now I feel like one of those babies you throw in the water to “teach” to swim. This week, for example, I have worked 32 hours and talk of coming in on Saturday has already come up! This, unfortunately, has eaten into my culinary (therapy) time.
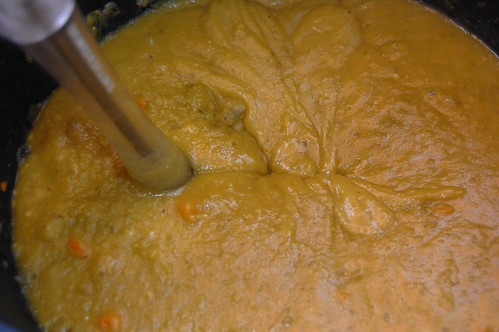
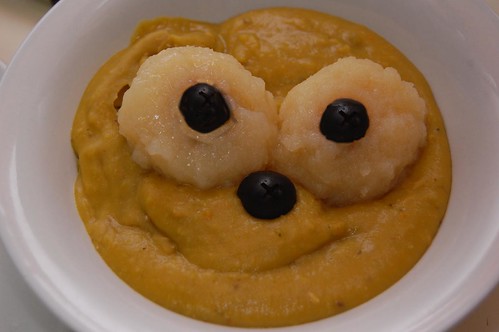
I really wanted to make a “blood soup” for theme week (I’m sure your mouths are watering), perhaps something along the lines of a borscht but with less cream, but there was too much left to chance. With my limited free time I needed something I had more confidence in so I turned to the noble yet somewhat unloved green split-pea. These things, when pureed look gross enough by themselves. But with eyeballs? Yuck!
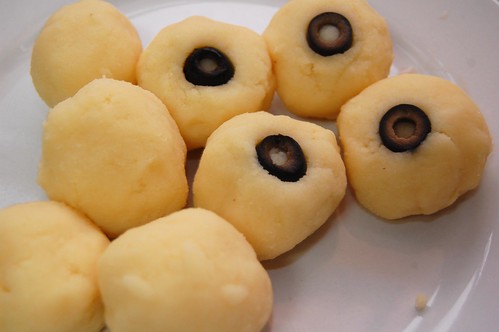
I tried using olive slices with no luck as they easily fell out during cooking. I recommend using whole olives instead. With these you can put them in before or after cooking, if no one minds you handling their food (or they don’t know!). 😛
Make split pea soup from just about any recipe where it’s primarily composed of the peas (not a lot of other colorful veggies). Be conservative on the water for a thicker (slimier) consistency.
After rolling dumpling batter into balls, press whole olives in them. Be sure they’re in their well, repressing the batter in so it secure and well formed. Cook as usual. Place your “eyeballs” in your soup and enjoy!
Everyday Food just posted some great Halloween treat ideas. Some of them I wouldn’t go anywhere near – personally I’m not a fan of making food look gory, though I think Edwin appreciates it. Check out –
Ghostly Bat and Cat Cookies (requires cookie cutters)
Ladies’ Fingers (yeah, you won’t see me making this one…)
Brain Cupcakes
Boo-tiful Cake (they’ve had this one around since last Halloween, but I absolutely love it!)
I Scream Sandwiches (very cute and yummy looking)
Ghoulish Petit Fours
Haunted House Cake (for the master decorator!)
Brownie Coffins (what can I say?)
Jack-‘o-Lanterns with Sorbet
What about a spooky dinner? How about –
Mashed Boo-tatoes
Spicy Batwings
Baked Rigaboney (I really couldn’t make these names up myself)
Ladies’ Fingers and Men’s Toes (this may be the worst looking of all!)
Finish off your party with some creepy cocktails!
Bloodthirsty Marys
Swamp Sips
Eyeball Highballs
Shrunken Heads in Cider (nope, THIS is the worst looking one of all!)
OoooOOooo! That’s me making a spooky ghost noise…

My favorite pumpkin ale is “pumking Imperial Pumpkin Ale” by Southern Tier Brewing. It’s a pretty rich beer, much like eating a slice of pie. But check out this awesome description from the label:
“Pumking is an ode to Púca, a creature of Celtic folklore, who is both feared and respected by those who believe in it. Púca is said to waylay travelers throughout the night, tossing them on its back, and providing them the ride of their lives, from which they return forever changed! Brewed in the spirit of All Hallows Eve, a time of year when spirits can make contact with the physical world and when magic is most potent. Pour Pumking into a goblet and allow it’s alluring spirit to overflow. As spicy aromas present themselves, let its deep copper color entrance you as your journey into this mystical brew has just begun. As the first drops touch your tongue a magical spell will bewitch your taste buds making it difficult to escape. This beer is brewed with pagan spirit yet should be enjoyed responsibly.”
Are you going to argue with a description like that? Heck no! But if you’re needing something a little more kid friendly, how about ghost cupcakes?
Break out your favorite Devil’s Food Cake recipe, or try Martha’s and cut it in half to make 12. Remember that how many cupcakes you make will be cut in half, because you’ll be stacking two cupcakes to make a ghost. Yes, you can use a box recipe, too.. just don’t tell Edwin!
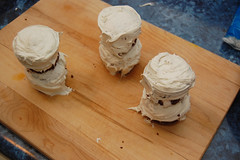
Bake your cupcakes, cool completely, remove from wrappers and set in the freezer for a few minutes to firm them up. In the meantime, whip up a nice white frosting like Martha’s Fluffy Vanilla.
When the cupcakes have firmed up a bit, frost the top and sides of each cupcake with a thin layer (using more on top) and then carefully stack two. Set back in the freezer for 10-15 minutes, making sure that they don’t topple over (you may use one toothpick in the center for added support, but if these cakes are meant for kids then you’ll want to be careful!). Don’t worry if your frosting is all crumby at this point – you’re just making a crumb coat.
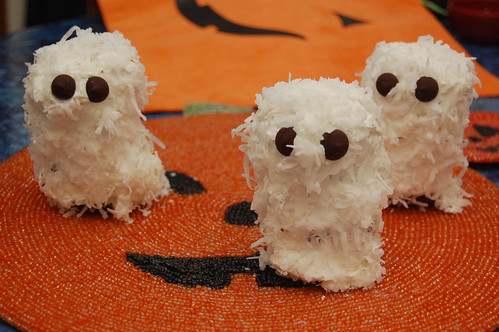
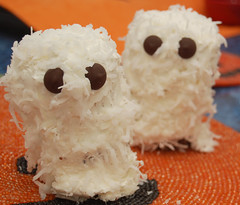
When frosting has set, remove from freezer and apply your final layer of frosting so that the cakes are completely covered. Cover the cakes with a layer of shredded coconut (which also helps hide any frosting imperfections that you were unable to get out). Add two bittersweet chocolate chips for eyes – if you’re having trouble getting them to stick just add a little frosting to the back. Use caution when transporting. Keep refrigerated until serving.
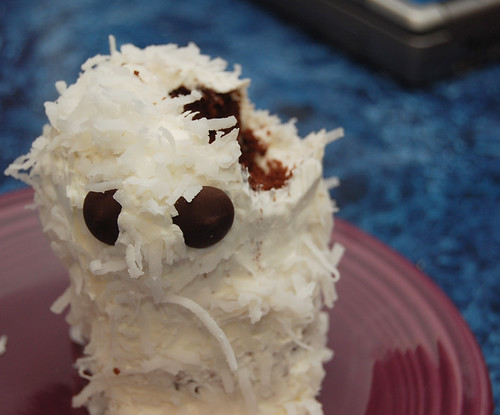
Note: My husband thought that these little cakes also somewhat resembled owls – I don’t see you couldn’t add a nice candy corn beak if you’d prefer to showcase owls instead of ghosts. But to make them more ghost like, make sure you put the eyes closer together.
Thanks to Jen for sending me these creative pumpkin recipes from Better Homes and Gardens. I’d like to try all of them, but here are some that looked best to me:
Pumpkin-Filled Cream Puffs with Maple-Caramel Sauce,
Pumpkin Sandwich Cake,
Spiced Pumpkin Dunking Sticks,
Pumpkin-Cherry Upside-Down Cake,
Pumpkin Fudge,
Pumpkin Pie Drops,
Pumpkin Tiramisu,
No-Bake Pumpkin Swirl Cheesecake,
Pumpkin Bourbon Pudding,
Pumpkin Bread Pudding with Toffee Sauce,
Pumpkin Spice Whoopies
Ahhhhhh, Halloween! Quite possibly my favorite holiday of the year. When else can you act (and dress) completely wacko without being considered a social pariah or candidate for a padded room? I still haven’t decided on a costume this year and time is running short. A friend and I are throwing a super hero and villians themed party and I haven’t been able to come up with an original, entertaining idea (suggestions welcome). Alas!

With most hallween-style foods, it’s all in the decoration. You take a cookie and make it an eyeball, or a pumpkin, perhaps going extreme with a tombstone topped cupcake. All cool (and tasty), but there are but there are some pretty cool inventive stuff out there as well.

This was a cool idea someone shared with me some time ago; taking use of pretzels in a non-chocolate-covered way. Plus, the 3D aspect I’m a fan of. Cookie witch hats and brooms! A great activity to do with kids. Treat these as guidelines. Use whatever cookie you want; just be sure it’s one that doesn’t “spread” too much during baking. Shortbread is a great option.

Prepare any cookie dough you’d like. For the hats, just bake some flat cookies. Once cooled cover with a chocolate icing or ganache. Top with a hershey kiss and pipe some frosting around the base. Voila! Super Shortcut: Take fudge-striped cookies from the grocery store (the ones with the chocolate covered bottoms) and simple top with a hershey kiss and piping.
For the brooms, take some pretzel rods and break them in half. Roll some small, flat balls of dough and poke the pretzel in it. Set is on your pan and press the teeth from a work to make the broom bristles. The taller these balls are the more they will spread, so be warned. Bake per the recipe (if you don’t bake till hard, you can repress the indentions a bit when they comeout). Once cooled, drizzled chocolate frosting or ganache where the cookie and the pretzel meet. Enjoy!
It’s an exciting week at DinnerCakes! We’ll be doing a Halloween theme this week with some fun and festive ideas. Also, yesterday was DC’s 1 Year Anniversary!
It’s hard to believe it’s been one full year of adventures in the kitchen (we’ve had great success and some real flops!). We’ve tried to broaden our horizons.. I work a little harder to add veggies to my dinners (see Pineapple Mango Chicken Curry, Ravioli with Asparagus, Spinach and Peas and Taco Salad with Drunken Black Beans). Edwin learned that he can go on vacation, eat things that would make Ronald McDonald blush and still call himself a flexitarian when he gets home (see Greetings From The West – Day 1, Travel Day 2 – A Little Mexican, A Little Hype and Food Photography – Ribs and Cactus Fries). 🙂

We also completely overhauled our site design and banner, and added several new features such as Our Favorites, an archive of our Kitchen Tips and Food Photography and an About Us page. Hopefully the quality of our photos will also continue to improve (I got a new camera after a few months of blogging and man, it’s hard to look at some of those early photos with the point-and-click camera!).
Have I gotten Edwin to enjoy pumpkin yet? No, but he does seem a little more open to the idea of trying some things? Do we have a perfectly seamless recipe archive yet? No, but I can tell you that it’s in the works!
Clearly the upcoming year will hold new adventures and new challenges. What kinds of everyday recipes will I come up with to make my clinical rotations in the hospital a little easier? I’ve received a lot of requests for crock pot dinners, so you can probably look forward to more of that here. Will Edwin learn to embrace healthy and lean meats like fish? Just how many cookies will both of us eat at this year’s Third Annual Bake-A-Thon (and how disgusting will we feel afterwards…)? Only one way to find out!
But back to Halloween Week –
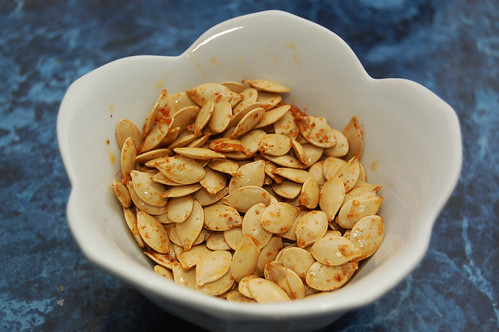
Probably a lot of you will be carving your pumpkins soon (and following our tips to make your Jack-o’-Lanterns last!). Don’t just throw away all that goo inside – you can make some tasty and healthy treats that are actually fun to eat. Pumpkin seeds contain both of the “good” fats – omega-3 and omega-6 fatty acids. They’re a great source of iron, too.
1 small/medium pumpkin
salt, chili powder, cayenne
oil
After carving and scooping out the insides of your pumpkin, preheat your oven to 400F. Separate the seeds from the pulp (be careful if you have contact dermatitis with squash like I do!) and rinse.
While oven preheats, boil seeds from one small/medium pumpkin in 2 cups of water with a dash of salt. Simmer for about 10 minutes, then drain.
Line cookie sheet with foil and brush with oil. Add the drained seeds to a small bowl and season with desired amounts of salt, chili powder, cayenne (easy on the cayenne, heavier on the chili powder) and a drop of oil. Stir until combined. Spread over the cookie sheet in one layer and bake for 12-15 minutes. Be sure not to overcook (they’ll start to get pretty dark if overcooking). Cool before serving.
Notes:
I like to eat mine whole, but some people prefer to remove the outer shell.
This recipe will also work well with acorn squash seeds (that’s actually what I used in these photos).
Enjoy Pumpkin Seeds plain, in salads, added to granola or in breads! For some fancy spice combos, check out 101 Cookbooks.
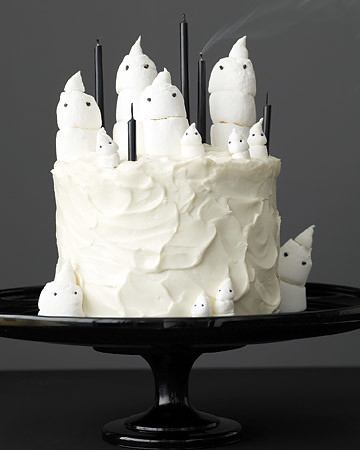
I’m normally not one to decorate for decoration’s sake. Part of this is because I suck at the aesthetics. I was not blessed with an overabundance of artistic skill. When it comes to drawing, I peaked at stick men (side note: I did write my own stick man comics in elementary school. it rocked). I’m also more about the food than the presentation. As my dad says, it’s going to look worse on the way out (thanks, dad).
Every now and then I like to flex my puny artistic muscle. Normally this serves a reminder as to why I don’t do this very often. Every now and then, however, things work out. Thursday was one of those days.

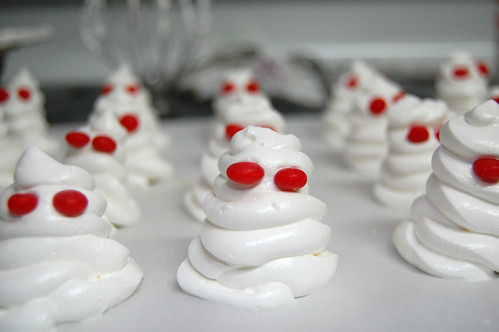
Like I said before, holidays have great themed culinary conentations. The eyeball cupcakes were a hit at work and I have to say I was quite pleased with these meringue ghosties. I got the idea from a post at 101 Cookbooks.
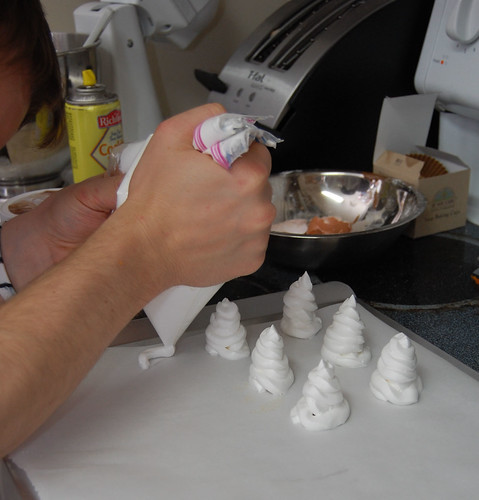
Meringue is a mythical beast for some; myself included. Sometimes it feels like you can do everything “right” and still crash and burn. Because of this I strongly recommend having a can of meringue powder ready in case disaster strikes. With this, you have two options. You can use it as back up or you can just screw from-scratch and follow the recipe on the can. I did the former. My from-scratch attempt was faltering so I added a bit of meringue powder and water. Success!
Ghost Meringues
adapted from 101 Cookbooks
Two large egg whites, room temperature
Three-finger pinch of salt
1/4 tsp cream of tartar
1/2 cup of confectioners sugar
Meringue powder and water (as backup!)
Combine the egg whites, salt and cream of tartar into a bowl and, using a hand or stand mixer, mix until frothy. Medium/medium-fast works fine here. At this point set your mixing speed to low and slowly add the confectioners sugar. Add it quickly and you’ll get a nice cloud of sugar dust.
Mix. Keep mixing. Mix some more. You’re going to be mixing for at least 20 minutes; probably more. The volume should increase significantly (double/triple in size) and the consistency should be thick and light. The meringue should form stiff peaks. (somewhere during this stage I concluded I was down the road of failure and started adding meringue powder and water. No measurements on this!)
Once at this point add to a pastry bag or a large plastic bag with a tip cut off and begin piping. I piped these similarly to the way you fill a cone with softserve ice cream. Start with a circle the size you want and keeping narrowing the spiral as you reach the top; eventually reaching a tip. Put two cinnamon decors on each as the eyes.


