Salty & Sweet – Chocolate Cookies with Pistachios

If you put a variety pack of cookies in front of me, 95% of the time I would not choose an all chocolate cookie. This may be surprising, but I gave up on chocolate cookies after several attempts where I couldn’t even taste the chocolate.

chocolate pistachio cookies

I thought up this recipe one night while lying in bed, after one of my battles with black bean brownies. I was thinking about other ways to use black beans instead of flour and agave syrup instead of sugar. I was also thinking about a batch of Tastespotting photos I’d oogled recently that boasted salty and sweet desserts.

chocolate and pistachio

The recipe below is a little different from what I’d originally planned (no black beans and no agave… it’s probably for the best!), but it turned out exactly the way I was hoping it would. What’s the difference? For starters, I greatly prefer the taste of baked goods made with unsweetened cocoa instead of melted chocolate. It captures the taste of the chocolate more and it makes the final product less dense.

two cookies

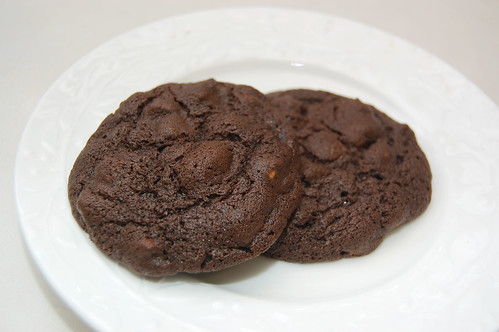
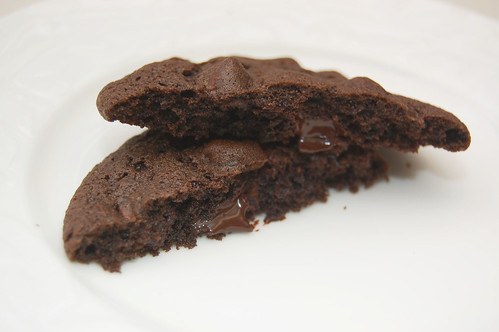
These cookies are slightly crispy on the outside and soft and chewy on the inside. The chocolate chips makes them unmistakably dark and chocolatey, and the pistachios add just a hint of saltiness. The instant coffee deepens the chocolate flavor without being particularly noticeable.

I had to take these to work the day after I made them because it quickly became clear that I couldn’t handle having them in the apartment. Whoops?

broken open

Salty & Sweet – Chocolate Cookies with Pistachios

1 stick unsalted butter, room temperature
1/8 cup granulated sugar
3/4 cups brown sugar
1 cup all purpose unbleached flour
2 ounces unsweetened cocoa (I used Ghirardelli)
1/8 (granulated) instant coffee
1/8 teaspoon kosher salt
1/2 teaspoon baking soda
1 egg
1 egg yolk
1 tablespoon milk
1 cup semisweet chocolate chips (again, I used Ghirardelli)
1/2 cup pistachio kernels

Preheat oven to 375F. Line two baking sheets with parchment paper.

Combine flour, cocoa, instant coffee, salt and baking soda in a medium bowl. Set aside.

In the bowl of a stand mixer using a paddle attachment (or using electric beaters if you don’t have a stand mixer), combine butter and sugars. When combined, add eggs one at a time. Slowly beat in the flour mixture, adding the milk at the halfway point. Stir in pistachios and chocolate chips. The mixture will resemble thick brownie batter.

Scoop batter using a tablespoon measuring spoon and, with the assistance of another spoon, drop rounded balls onto a parchment lined baking sheet approximately two inches apart. Bake for 15 minutes.

Makes approximately 2 dozen cookies.

A friend of mine recently requested more tofu recipes and since I become giddy as a school girl when I receive requests, I decided to accommodate immediately. I also had an extremely late Saturday night and there’s something about the oily feel of some stir fries that just felt so right on Sunday.

Tofu with Broccoli

On the rare times I cook with tofu it’s often in stir-fries. It’s easy to add and since tofu doesn’t really have much of a flavor on its own; the multitude of ingredients has the potential to make a real impact on the stuff. One of the key things to note about tofu is you often want to marinate it prior to cooking; ensuring that whatever flavor you’re shooting for really “sticks” with it. Of course there’s no universal time to go by, but 30 minutes is a good guideline.

Tofu Stir-Fry with Broccoli and Bok Choy

Got any good tofu recipes? Send em along!

Tofu Stir-Fry with Broccoli and Bok Choy
1 1/4 pound firm tofu
3 tablespoon sesame oil
2 tablespoon dark soy sauce
2 tablespoon chili oil
1 tablespoon ginger; minced
2 garlic cloves; minced
1 teaspoon agave nectar
1/4 teaspoon salt

3 tablespoons peanut oil
1 large yellow onion; chopped
1 green bell pepper; sliced
10oz broccoli; chopped into roughly equal sizes (cut large florets in half)
1 head bok choy; chopped

Cut the tofu into 3/4 inch pieces (roughly) and a wide container; preferably tupperware. Mix the oils, soy sauce, ginger, garlic, agave and salt and coat your tofu with it. The bottom layer should be partially covered. Marinate for fifteen minutes then rotate the tofu so the top layer is marinating. If using tupperware, simply lid and turn upside-down. Marinate for another fifteen minutes.

Heat your wok to high and add your oil. Swish around and add your onion and bell pepper; stir-frying for approximately 3-4 minutes or until onions become translucent. Add the broccoli and stir-fry for another 3-4 minutes until broccoli begins to soften slightly. Add your tofu with marinade and continue cooking for five minutes; until tofu is hot. Add your bok choy and (yet again) stir fry until leaves begin to wilt. Serve immediately and enjoy.

Kitchen Tips: What is Roasting?

Continuing on from an earlier Kitchen Tips, today we’ll talk about roasting. Whether working with cuts of meat or vegetables the basics are the same. Roasting can considered a style of baking because, just like baking, your food is cooked by being subjected to heat on all sides from hot air.

Roasting is almost always done uncovered, in a shallow pan and with little to no water. Why? Browning. These settings allow your food to keep (relatively) dry to brown and crisp. Adding water can result in more of a steaming effect which you don’t really want.

With vegetables (and I suppose meats as well), you want to keep into consideration spacing. As your vegetables cook they will release their moisture. If you crowd your vegetables they will essentially steam/moisturize each other; giving less browning (there are some exceptions to this, but not many). The spacing depends on the situation, but I recommend starting with half an inch and exploring from there. Remember, pans are cheap, but good food is priceless!

Chicken and Black Beans with Avocado Salsa

My husband and I have been feeling a little lazy lately about cooking. We’ve both been busy, and on days when you’re just drained it’s not only hard to cook, but it’s likely that your kitchen may not be stocked with fresh options.

On this particular day I knew we didn’t have anything in the fridge. We had some chicken in the freezer, but we try not to defrost chicken in the microwave if we can help it (and I haven’t yet tried Edwin’s ice bath method).

avocado

I went to the grocery store after work and picked up some chicken breast (that I didn’t have to defrost). On my way to the cash register I spotted some avocados. I don’t think avocados are in season, and I know that they’re high in fat, but at that moment I just wanted some avocados!

For my calorie conscious friends, listen, avocados are good in moderation!

As I was walking home, I still had no idea what I was going to do with my small avocado and chicken. I thought about making chicken sandwiches with slices of avocado on top, but I knew I didn’t have buns. I decided on a citrusy, guacamole-like salsa over baked chicken and black beans. What an awesome change to spice up our typical routine! This dish is light but filling. The lime juice gives it a lot of zip, and it’s not very spicy.

chicken avocado

Chicken and Black Beans with Avocado Salsa

1 lb boneless skinless chicken breasts
1 can black beans

For the Chicken Marinade
1 tablespoon olive oil
1 tablespoon sweetened lime juice
1/2 teaspoon chili powder
dash cayenne

For the Avocado Salsa
1 small Haas avocado, peeled and sliced
1 chili, minced with seeds removed (or 1/4 teaspoon red pepper flakes)
1 tablespoon sweetened lime juice
1/4 teaspoon salt
3 cloves garlic, minced
dash black pepper
dash cayenne

Cut chicken breasts in half longways and marinate in olive oil, sweetened lime juice, chile powder and cayenne for at least 30 minutes. Preheat oven to 375F and bake for approximately 15 minutes. Cut into the middle of the thickest piece to ensure the chicken is thoroughly cooked.

While chicken is baking, warm black beans in a small sauce pan on the stove.

Peel and slice avocado and place in a medium size bowl. Add minced chili or red pepper flakes, sweetened lime juice, salt, minced garlic, black pepper and cayenne. Mash avocado with the back of a fork while combining ingredients. Don’t mash too much, you want the salsa to be chunky.

Spoon black beans onto a plate and follow with cooked chicken breast. Spoon avocado salsa over the chicken and serve!

SusanV of Fatfree Vegan Kitchen posted a dish that looked pretty rockin’ the other day: No-Queso Quesadillas. I really love some of the recipes she writes, they were pivotal when I was making the move away from meat, but I don’t think I’ve ever made something of hers that I’d call comfort food. This, however, had potential.

No-Queso Queso

I think I’ve mentioned before that the lady friend gave me Fresh Food Fast, a book that’s yielded me pleasant results thus far. Inspired by one of its recipes, I decided to take a shot at souping up SusanV’s recipe and make it a true comfort food.

Preparing Our Quesadillas

The non-queso queso is good, but won’t fool anyone into thinking it’s a cheese. The zucchini and black beans add a meaty-ness to the dish and work well with the queso; not overpowering. Next time I intend to try adding onion if I can do so without overfilling. I recommend you give this dish a shot and let us know what you think.

Black Bean and Zucchini Stuffed No-Queso Quesadillas

Black Bean and Zucchini Stuffed No-Queso Quesadillas

2 cups black beans; drained (one can)
1 jalapeno pepper; diced (with or without seeds depending your spice preference)
1 medium zucchini (10oz); shredded
8 6-inch tortillas; any kind

Queso:
1 cup water
1 cup milk
2/3 cup nutritional yeast
7 teaspoons corn starch
4 teaspoons lemon juice
1 teaspoon salt
8 garlic cloves minced
1/4 teaspoon cayenne pepper (optional)
2 tablespoon tahini
1/2 teaspoon tumeric
1/2 teaspoon onion powder

Put your drained black beans and jalapeno pepper in a small mixing bowl. Take one handful of the shredded zucchini at a time and squeeze out much of its liquid, adding it to your beans. Mix until well combined.

Whisk your “queso” ingredients together until smooth. Add to a medium or large-sized non-stock pan and, while stirring occasionally under medium heat, bring to a boil. Reduce heat to low and simmer, stirring constantly until queso is think and smooth; approximately 2-4 minutes.

Brush a small amount of oil on one side of four of your tortillas. On the other four tortillas, spread your queso followed by thin layer of your bean mixture. Bring a large-sized pan to medium heat. Add one of your oiled tortillas, oil side down, and cook for 2-3 minutes; until browning. Remove from the pan and add one of your bean/queso topped tortillas to the pan, adding your precooked tortilla, oil side facing down (touching the bean mixture). Cook for 2-4 minutes, until other side is browned, and remove. Repeat with your remaining tortillas. Enjoy.

Food Photography – The Story of My Mom's Birthday Cake

Well, I promised an update on how my mom’s birthday cake turned out, and here it is! I made a cranberry-lemon pound cake with lemon curd filling and Italian meringue lemon buttercream frosting.

pound cakelayers

The cake and buttercream are from, my favorite, CakeLove: How to Bake Cakes from Scratch, and the lemon curd is from Martha Stewart (the CakeLove lemon curd recipe called for more egg yolks and butter than any living thing should ever ingest).

stacked

I was very pleased with how everything turned out and how it fit together. With a little help from Wilton’s 10-inch cake circles, my layers sliced and stacked without any difficulty.

layers on cake standfrosting

My mom arrived just as I was putting the finishing touches on the cake decor; I didn’t even have time to change out of my fat squirrel t-shirt… I hope it gives you a good laugh!

heathermombday

I was especially happy with the decorations. Remember I told you that I actually drew specs? My mom loves the ocean, so I wanted to use a few sea shells as tastefully as possible.

topcake top

She also likes hydrangea, which I think happen to look very beautiful even when they’re fake.

bdaycake

I did unfortunately learn that I don’t care for lemon curd at all… not even a little bit. I scraped it off easily enough on my slice and enjoyed the rest.

top of cakecake slice with flowers

It was extremely rich – one slice and you’re set for life! Next time I think I’ll try something a little lighter. You really don’t want to know just how many sticks of butter and individual eggs were sacrificed in the making of this cake… really, it’s better this way.

cake slice

Spring is officially here, and I took full advantage of it this weekend. Some friends and I got together to spend most of Sunday climbing at Carderock, Maryland. The weather was beautiful, the climbs were great… you couldn’t ask for more. It made me a bit sad to leave and prepare for the work week, but another gorgeous weekend will come.

Red Wine Vinaigrette

As the climate changes, so does the type of food we cook. Soup is one of the big things for winter (one of the few things I enjoy about the season) but as the weather warms, often what we eat cools. Salads are big and a salad is what I made that evening; albeit not the traditional leafy kind. This baby has red lentils as the star and I was pretty happy with the results.

Red Lentils and Red Bell Peppers

Like the rest of the lentil family, the reds are a great source of protein. They also have a mild earthy flavor and cook in very little time. The red bell peppers add their sweet compliment and the red wine vinaigrette enhances without overpowering. Be sure to drain the lentils well, though! Otherwise you might end up with something that’s a cross between soup and salad.

Red Lentil Salad with Red Wine Vinaigrette

Red Lentil Salad with Red Wine Vinaigrette
Be sure to drain your lentils well or you will get a rather watery salad. Bleh.

3 cups dried red lentils; cooked and drained
2 red bell peppers; diced
4 garlic cloves; minced
1/3 cup red wine vinegar
1 teaspoon dried oregano
1/4 teaspoon dried thyme
1/4 teaspoon dried parsley
2 table spoons olive oil

Stir your lentils and red bell peppers in a large bowl. Combine the rest of your ingredients separately to form your vinaigrette, whisking to ensure well mixed. Pour your vinaigrette onto your lentils and bell peppers, mix well and enjoy.

Warm and Satisfying Sweet Potato Biscuits

Most summers, my family tries to sneak in at least a brief vacation to Nags Heads, NC. Though Nags Head is gradually becoming more built up, luckily some things haven’t changed.

cooked biscuits

Our favorite and most consistent restaurant is Kelly’s Restaurant and Tavern in the Outer Banks; if you haven’t been then you’re really missing something special. It’s a nicer establishment than most (ie, expensive), but it’s well worth the expense. Usually when we go I always order the flounder, but it’s incredibly difficult to restrain myself from filling up on their signature Sweet Potato Biscuits.

These biscuits aren’t beauty pageant winners – they stay fairly flat and don’t rise in the oven. They aren’t the light, flaky, buttery kind, in fact they’re quite dense and heavy. What makes them so great? They smell heavenly, they’re very unique, they’re filled with sweet potatoes which are actually good for you and they stick to the roof of your mouth. Yum!

sweet potato biscuits

Kelly’s will give you the Sweet Potato Biscuit recipe if you ask for it, but you’ll be surprised to learn that they’re made using Bisquick. While this isn’t necessarily a bad thing, I prefer making it all from scratch – which really isn’t much more difficult and you’ll likely have all of the ingredients already on hand.

I read a few different biscuit recipes to come up with a combination of ingredients that I thought could replace the Bisquick while maintaining the great taste I’m used to. I made these Friday night, just in time for the series finale of Battlestar Galactica (if you happened to watch this, what did you think? my husband joked, “the moral of 4 seasons: robots will probably kill you”). We scarfed a few of these down until our stomaches hurt (hey, I warned you they were dense). These are best enjoyed warm.

sweet potato biscuits

Sweet Potato Biscuits

1 pound sweet potatoes (approximately 2 sweet potatoes)
1 cup light brown sugar
1/4 cup milk (I used skim)
2 cups all-purpose unbleached flour
2 teaspoons baking powder
1/2 teaspoon baking soda
1 teaspoon salt
1 teaspoon sugar
4 tablespoons unsalted butter

Preheat oven to 350 F.

Peel sweet potatoes, then cut into 2 inch pieces and boil until there is very little resistance when pierced with a fork. Mash sweet potatoes using a masher or the back of a fork. Add all remaining ingredients and mix well.

Using two spoons, drop biscuit mixture onto a parchment paper lined cookie sheet; biscuits should be approximately 2 1/2 inches wide and 1/2 inch thick.

Bake for 16-18 minutes. The moistness of the mixture makes it so that these biscuits do not rise much. Keep an eye on them so that they don’t overcook. Biscuits are ready when they have set and they are slightly firm to the touch.

Makes about 1 1/2 dozen biscuits.

Note: Be sure that these are completely cooled before putting them away, if there are any left. Do not store in an airtight container because the tops will get “sticky.”

Kitchen Tips – Beating Egg Whites

My biggest pet peeve with cookbooks is when they throw around undefined terminology, leave too much to the imagination and have no photos accompanying recipes.

If you’re relatively new to baking and a recipe advises you to beat egg whites until they’re “stiff white peaks,” you may find yourself wondering what in the world this means.

First separate the egg whites from the yolks. Let the whites get to about room temperature, or at least not quite as cold. For best results, you will need the assistance of an electric mixer or stand mixer – your arms likely don’t have the stamina!

With your electric or stand mixer, beat the egg whites on high speed with a whisk attachment for several minutes. Do not rush the process. You’ll know you have “stiff white peaks” when the egg whites resemble marshmallow fluff. Your egg whites should also triple in volume. Follow your recipe instructions when adding other ingredients such as sugar.

Patience and beating at high speed is key!

white peaks

More red bell peppers! Yes, the sales have still been going strong, and I’m still taking advantage. A reader recently commented about quinoa and I realized that we haven’t done any recipes with that ingredient yet. That’s a shame really, because like couscous, quinoa is food that’s great for you and easy to prepare. In addition to this, its subtle nutty flavor has potential to enhance many a dish.

Cooked Quinoa

Do a search for quinoa salad with black beans and mangos and you’ll come up with more hits that you can count. I tried to go a different route. Now, I can’t say this dish is amazing or unique, but I enjoyed it. None of the flavors dominate, so it’s flavor is subtle and complex.

And yes, you can definitely use fresh corn and beans. I was feeling lazy!

Black Bean, Corn and Quinoa Salad

Black Bean, Corn and Quinoa Salad
Follow the instructions on the packaging for cooking quinoa, but often this is just simply cook one cup of uncooked quinoa in two cups of boiling water, and let simmer. One cup of uncooked quinoa yields approximately two cups cooked.

1 can black beans; rinsed and drained
1 can corn; rinsed and drained
1 red bell pepper; diced
2 cups cooked quinoa
2 tablespoons red wine vinegar
1/4 teaspoon coriander
1 teaspoon salt
4 teaspoon oil
3/4 teaspoon cumin
1/4 teaspoon cayenne pepper
4 teaspoon lime

Combine all your ingredients. That’s it! Enjoy.