Work has been been crazy these past few weeks, forcing me to spend quite a few extra hours in the office. I always feel more slighted about this in the summer months. Why couldn’t this just happen in the winter when I’m all for hiding away in any warm room? True, I prefer hiding under my covers, but hey it beats the cold. But summer? Summer there’s hiking, climbing, picnics, swimming, the list goes on and on. Alas…

Pan-Frying Chickpeas with Broccoli

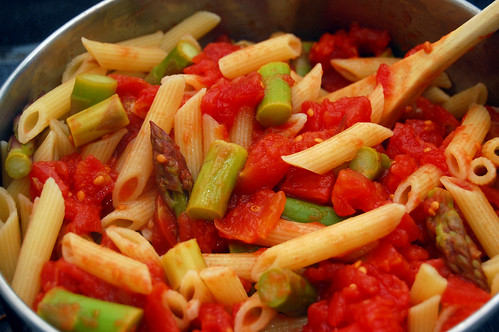
Of course, a busy schedule is no excuse for lousy eating. All those fast food trips will catch up to you, so it’s good to have some quick and easy options. At only a handful of ingredients and one pan, this sucker fits the bill pretty well. You’re looking at only 10 minutes of prep followed by another 15 of actual cooking. Rachel Ray, eat your heart out (which, by the way, is a ridiculous saying).

Pan-Fried Chickpeas and Broccoli

Pan Fried Chickpeas and Broccoli
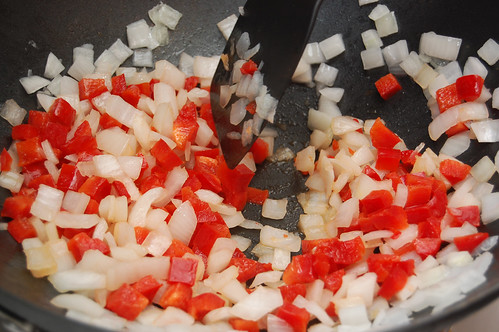
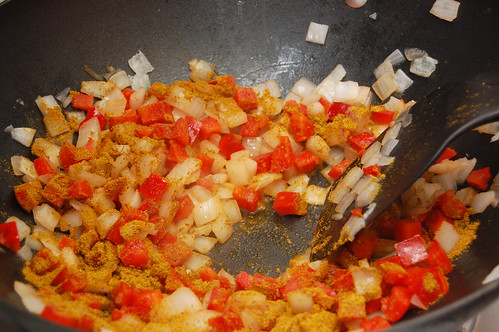
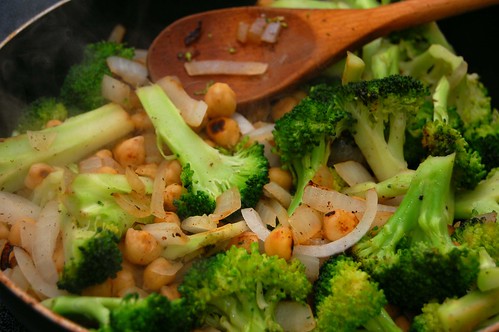
This recipe uses very little oil, so be watchful. Stir too often and you won’t get any golden browning. Stir too little and you’ll get some burning.

1 tablespoon olive oil
1 can chickpeas; drained (or two cups cooked chickpeas)
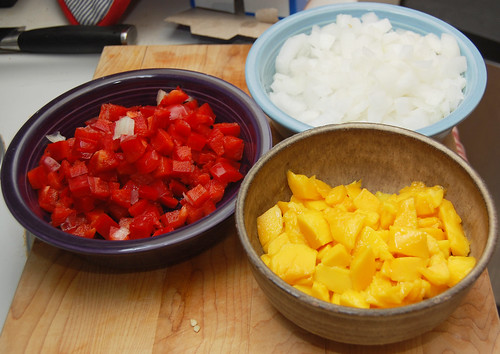
1 head of broccoli; cutting the florets into halves or thirds depending on size
1 yellow onion; chopped
Zest of 1/2 lemon
Juice of 1/2 lemon
1/2 teaspoon salt

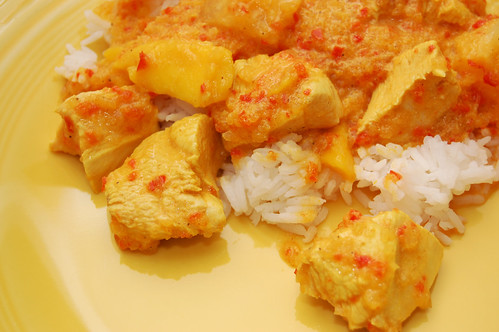
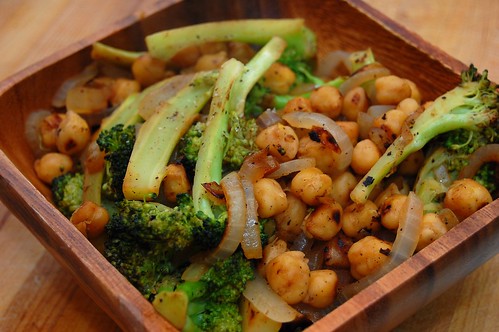
Heat the oil in a large pan under medium-high heat. Add the chickpeas and stir occassionaly until the begin to brown and turn golden; 4-5 minutes. Don’t stir too often or you won’t give them a chance to brown. Add the onion and broccoli and continue to saute. Stir more frequently now, but not continuously. After the broccoli begins to brown a bit and the onions have softened (7-8 minutes), add the zest, juice and salt; stirring for one minute for everthing to come together. Remove from heat and serve with salt to taste. Enjoy.

Pineapple Mango Chicken Curry

If I seemed a little scatter-brained lately, there’s a good chance that I am. You see, there are some big changes going on in the Ghost Baker household…

mangopepperonion

For starters, we’re moving! After three years in the DC metro area (four for Morgan), we’re picking up and moving back to Charlottesville, the town of our alma mater.

This fall I’ll be starting a second-degree nursing program leading to a master’s of science in nursing, moving from the research side of healthcare over to the clinical side. I’m pretty excited about it!

pepperonion

Though Chef Edwin and I will no longer be just a stone’s throw away and there might be a week period where my pots and pans are living in boxes instead of having culinary adventures, Charlottesville offers a lot of really cool things. In 2004, Charlottesville was ranked the best place to live in the United States in the book Cities Ranked and Rated by Bert Sperling and Peter Sander, based on cost of living, climate, and quality of life.

I see many visits to the farmer’s market in my future. If you’re from the area, please let me know other great things to do, see and eat!

curry

In any event, the kitchen isn’t packed up just yet. So today I’ll share with you a very tasty pineapple mango chicken curry recipe. I adapted the original recipe for a mango curry chicken from Simply Recipes. I had to figure out a way to keep the mango flavor toned down because I’m not a huge fan of that particular fruit.

This dish came out on the sweet side because of the pineapple and little bit of sugar (almost like a sweet and sour chicken, but really not quite). If you’d like to tone down the sweetness, add some vinegar. Neither the pineapple nor the mango are overpowering, though. I added most of the pineapple and almost all of the mango to the food processor instead of leaving more as fruit chunks at the end (since, as I said, I’m not a huge mango fan). You can of course vary this according to your personal tastes.

pineapplemangochickencurry

Pineapple Mango Chicken Curry
adapted from Simply Recipes

Vegetable oil for pan
1 large onion, diced
1 red bell pepper
3 garlic cloves, minced
1 Tablespoon fresh ginger, minced
2 Tablespoon yellow curry powder
1/2 teaspoon cumin
1 mango, peeled and diced
1 can chopped pineapple, drained (15 oz.)
2 Tablespoons apple cider vinegar
1 Tablespoon Sugar
1 1/4 cup water
1 – 1 1/4 pounds skinless boneless chicken breasts, cut into 1-inch pieces
1/2 cup light cream
Salt and pepper, to taste
Dash of red pepper flakes

Heat oil in a large sauté pan over medium heat. Add onions, stirring occasionally until soft and translucent, about 5-6 minutes, then add red bell pepper. Add the curry powder and cumin, cook for a few more minutes. If spices begin to stick too much to the bottom of the pan, add a little more oil. Add the ginger and garlic, cooking for an additional minute or two.

Add vinegar, water, 1/2 to 3/4 of the chopped mango and 1/2 to 3/4 the pineapple to the pan. Bring to a boil, then lower heat to a simmer for about 15 minutes, stirring occasionally. Remove from heat and carefully add to food processor. Pulse until smooth, then return to pan.

Add chicken and return to a low simmer. Cover and cook for 8-10 minutes, or until chicken is cooked through.

Add remaining mango and pineapple to the pan. Carefully add cream and sugar and cook on low for an additional minute, uncovered. Do not boil!

Add salt and pepper to taste and serve over rice. Makes about 3 servings.

Tandoori Inspired Chicken and Red Potatoes

On Saturday night I started not feeling very well, so Morgan and I spent most of Sunday just relaxing and watching episodes of our latest tv addiction – Mad Men.

coriander

If you haven’t seen Mad Men, it’s an AMC drama that begins in 1960 at an ad agency in New York City. If you can let yourself get past the exorbitant sexism of the 1960s which the show captures a little too well, it really is enjoyable to watch; however, I think I’m experiencing some unintended side effects from watching it.

I gave myself a french manicure as we watched on Sunday. I also painted my toe nails, straightened my hair and wore a skirt to work on a Monday. These things might be the normal routine for a lot of women, but for me, and all at the same time, made me wonder! My style is better described as “no muss no fuss,” or more colloquially known as “lame.”

tandoori spices

I also made a matching Indian style rice pudding to go with the Tandoori Chicken I planned. And I thought ahead enough to make a side dish. Usually all my efforts go into the main course and I skimp a little on the sides. Don’t worry, I’m sure all this primping and organization will quickly pass, but I may have done a bit of a 1960s skip when my husband started raving about how this dinner turned out.

red potatoes

As you might imagine I’m always trying new things in the kitchen, so when Morgan really gets excited about something it’s very encouraging! This is probably the closest to an authentic Indian style meal that I’ve gotten. It’s also, somehow, fairly easy to make. No painstaking prep work or hours of simmering spices – a great marinade does most of the work.

ricepudding

I adapted this from a David Lebovitz recipe to make it a little more accessible for every day cooking. I removed some of the more exotic ingredients, like saffron powder or saffron threads, used non-fat yogurt instead of whole milk yogurt, added in some yellow curry powder and replaced the chicken thighs and legs with simpler boneless chicken breasts. I also quartered some small red potatoes, coated them in a yogurt and curry dressing to compliment the chicken and roasted them until done.

The yogurt gives the chicken a lot of tang. It’s spicy, but not particularly hot. We really enjoyed this and hope you do, too!

tandoori chicken and potatoes

Tandoori Inspired Chicken and Potatoes
adapted from David Lebovitz

1 1/2 pounds boneless skinless chicken breast
1/2 teaspoon coarse salt
1 teaspoon ground cumin
1 teaspoon ground coriander
1/2 teaspoon ground cinnamon
1/2 teaspoon paprika
1/2 teaspoon turmeric
1/2 teaspoon curry powder
1 1/2 teaspoons chili powder (use less for less heat)
8 turns fresh ground black pepper
1 cup plain non-fat yogurt
1 tablespoon sweetened lime juice
1 tablespoon finely-minced fresh ginger
1 tablespoon finely-minced garlic

Cut chicken breast in half lengthwise. Add all the remaining ingredients to a gallon ziploc bag, squeeze out the excess air and seal. Massage the bag to mix the marinade and coat chicken. Refrigerate for several hours or overnight.

Preheat oven to 400F. Cover a large baking sheet with foil and place chicken with the thick marinade on sheet. Bake for 20 minutes, or until cooked through.

For potatoes:
6 small red potatoes, washed and quartered
1/2 cup plain non-fat yogurt
1 tablespoon yellow curry powder

Add all ingredients to a large ziploc bag and massage to coat. Pour contents of bag onto baking sheet, setting some of the liquid aside. Roast potatoes for approximately 40 minutes, pouring the remaining liquid over the potatoes and turning at the halfway mark, or until a fork inserted into potato goes in easily.
*Note – potatoes do take a long time to cook, so you will want to begin this before the chicken. When potatoes are done, set in a bowl and cover with foil – they will keep hot.

If you’d like to make rice pudding for dessert, you may like to use your leftover rice from dinner with this recipe from Elise. I used this minus the raisins.

My sister recently returned from a year in Marshall Islands working with World Teach. Before that she lived in Alaska for several yearss. With all this traveling, she hasn’t been in the area much, so it goes without saying that our mother was quite ecstatic about her arrival. But she’s not in town long. In a matter of days she’s off to Chicago to prepare for graduate school. Because of this and Father’s day, I decided to spend the weekend in Richmond seeing family and catching up.

Vegetarian Sloppy Joes with Tempeh

I’ve been trying to spend more time experimenting with different varieties of vegetarian dinners; those outside my traditional niche of soup, salads and roasted vegetables. I’ve never done much with the faux meats (tofu, tempeh, seitan), but hey, gotta broaden those horizons. I wanted to start with something that reminded me of what I use to eat when as a kid (this is Edwin’s family post).

When I was growing up, there were certain meals we’d always have. Mondays were spaghetti night, Fridays were pizza night (and TGIF!) and not every week, but pretty often there’d be sloppy joes night. I loved sloppy joes night. We never had it with hamburger buns. We always ate it with regular sandwich bread and french fries on the side. So. Good.

Vegetarian Sloppy Joes with Tempeh

So here’s my attempt at replicating that old classic with tempeh and NO can of manwich. Will it fool anyone into thinking it’s the real deal? No. Is it good? Definitely.

Vegetarian Sloppy Joes with Tempeh

1 onion; chopped
3 cloves of garlic; minced
1 red bell pepper; diced
1 celery stalk; diced

1 teaspoon dried oregano
1/4 teaspoon chili powder
1/4 teaspoon cayenne pepper
1/2 teaspoon paprika
1 tablespoon brown sugar
1 can tomato sauce
1 can tomato paste
1 can diced tomatoes
8 ounces tempeh

Sweat the onions, garlic, red bell pepper and celery under medium low heat in a large pan for 15 minutes; stirring occasionally. Add the herbs, sugar and spices along with the three cans of tomato. Raise the temperature to medium and stir for a few minutes. Add the tempeh and continue to cook until everything is heated through. Serve and enjoy.

Reader Request – Vodka Cream Sauce Using Fresh Tomatoes

A few weeks ago a friend contacted me about homemade vodka sauce. She happens to love it, and she and her significant other have a huge garden where they are about to come into a large surplus of tomatoes – something like two bushels of tomatoes a week!

blanched tomatoes

I had never made vodka sauce from scratch, but Edwin and I are always ready for adventure here on DinnerCakes.

tomatoes simmering

I unearthed a discussion thread about making vodka sauce from scratch on Chowhound. A few of the commenters had some interesting ideas about making it from scratch, and a number of others just suggested a combination of canned and fresh tomatoes to really get the best taste. For this first attempt I used only fresh tomatoes, but I agree that adding some canned tomatoes would probably make a bit of a fuller sauce.

vodka sauce

My sauce came out light and fruity, and I served it over gnocchi pasta. My husband and I both came to the realization that while we love gnocchi for the first few bites, we get a little bored with it towards the end. I think we might have enjoyed this more served over a different kind of pasta.

However, this is a good, lighter style vodka cream sauce that’s just right for summer! Please let us know if you have your own variation of vodka sauce using fresh tomatoes.

gnocchi with vodka sauce

Summertime Vodka Cream Sauce
inspired by Chowhound forum

2 fresh tomatoes
2 cloves garlic
1 tablespoon vodka
1/4 cup light cream
salt and red pepper, to taste

Wash tomatoes and make a few shallow cuts in the skin. Boil water, add whole tomatoes to boiling water for a moment, then remove and run cold water over them (ie, blanche tomatoes). The skin will now peel off easily. Peel tomatoes and set aside.

Heat a large pot and add a liberal amount of oil. Mince garlic and add to oil. Stir so that garlic does not burn. Quarter tomatoes and add to pot; simmer on medium heat.

Continue to heat until tomatoes come apart. Stir occasionally and break apart tomatoes with a wooden spoon as they simmer. This process will take a little while until the tomatoes turn to a pulpy sauce. Continue to stir frequently while simmering so that some of the liquid boils off and the sauce thickens, about 20 minutes.

As the sauce begins to caramelize, add the vodka and stir well. Add the cream last, then sprinkle with salt and red pepper. Pour over pasta while warm.

Jeff's Chicken Adobo

Happy Monday, DinnerCakes readers. I hope you had a good weekend! If you read Saturday’s post, then you know that I kept pretty busy! The joint cook-out went very well and, as expected, we had entirely too much food. Just as a party should be!

raw chicken

After all that cooking, I can safely say that the last thing I felt like doing the next day was making dinner. My husband, Morgan, and I worked together to make this dish; one of our friend Jeff‘s favorites – Chicken “Adobo.”

cookingchicken

Adobo style is Latin American and typically involves preparation with red chili peppers and/or tomato sauce. That’s why this recipe from Jeff perplexes me a little (and why I put it in quotation marks above), because it has no chili peppers or even red pepper. I apologize for the name confusion, but it’s a very flavorful and delicious dinner just the same!

I’m not a huge fan of ginger, but I actually enjoyed it in this dish. The bay leaves also add some great flavor. Next time we make it I’ll probably add cayenne and chili powder because I love a little heat (and it would be more aptly named). That’s just a personal preference, though. This dish doesn’t necessarily need heat – so enjoy!

chicken adobo

Jeff’s Chicken Adobo

olive oil (just enough to coat the bottom of the pan)
1 lb. boneless chicken breast, cut in 3/4″ chunks
soy sauce
vinegar
water
1-2 inches of ginger root, grated
6-8 garlic cloves, grated or finely chopped
4-6 whole dried bay leaves
fresh ground black pepper, to taste
1 1/2 cups dry rice (basmati works great)
pinch of salt

Chicken:
Place chicken into a container to marinate. Cover with a mixture of equal parts soy sauce, vinegar and water. If you prefer a stronger flavor, you can cut back on the water. Marinate for at least five minutes (chicken may be marinated longer or even overnight for stronger flavor).

Add ginger, garlic, bay leaves and black pepper. In a large pan, heat the olive oil. Once the oil has heated, add chicken (saving the marinade).

Saute the chicken on medium-high heat until it is done or mostly done. Add the marinade and reduce the heat to medium. Continue cooking until sauce reduces to desired thickness. Serve over rice.

Rice:
Rinse rice in a pot 4-5 times and drain. Cook in a rice cooker, or according to package instructions.

Spicy & Hot Tofu Puffs

Can you tell that I’m on an Indian food kick?

Just yesterday I decided to treat myself to the Indian buffet near my office for lunch. So delicious, and so much food! My birthday is on Saturday and, I’m not sure if any of you are aware, but calories actually don’t count on your birthday (or the days leading up to and after your birthday).

tofu

So a few weeks ago when I saw a recipe for Chile Pea Puffs on 101 Cookbooks, I was ecstatic and decided to make something similar. I took out the paneer and added silken tofu, garbanzo beans, Indian chillies, cumin and curry powder.

peaschickpeastofu

I couldn’t find wonton wrappers at the grocery store, but I picked up phyllo dough. Unfortunately it was my first time working with phyllo; I got impatient and I did a pretty sorry job with them. I’m not jumping at the chance to work with phyllo again, but the filling was great!

peaschickpeastofumashed

The Indian chillies give this quite a lot of heat. If you don’t like heat, then you’ll want to leave the seeds of the chillies out, or leave them out entirely along with the red curry powder (seriously, it’s hot!). My husband who, like me, doesn’t eat a lot of tofu and isn’t totally comfortable with it yet, didn’t even know that there was tofu in this until I told him. We were both pleasantly surprised! I recommend that tofu-phobes give this a chance – this recipe had both of us scratching our heads as to why we don’t work with tofu more often!

puffs

Spicy & Hot Tofu Puffs
Adapted from 101 Cookbooks

1 1/2 cups green peas, cooked
1 can garbanzo beans (15 ounces), drained
1 package silken tofu (12 ounces), cubed
2 Indian chillies (seeds removed for less heat!), crushed
1 teaspoon yellow curry powder
1/2 teaspoon red curry powder
1/4 teaspoon cumin
1/4 teaspoon salt
1 clove garlic, minced
wonton wrappers or package of phyllo dough (if using wonton wrappers, use instructions here)

Preheat oven to 400F. Spray baking sheet with cooking spray or line with parchment paper.

Combine all prepared ingredients in a large bowl. Mix well and crush lightly with the back of a fork.

Allow phyllo to thaw. Unroll and place mixture onto center of one piece. Fold edges together to make a pocket, brushing edges with egg whites to hold in place and secure seam. Place on baking sheet, forming a single layer of puffs.

Cook for 4 minutes, then turn puffs once and cook until crisp and golden brown.

Crisp and Juicy Curry Chicken

We hope you all enjoyed Rainbow Week! It was a lot of fun for us to do. If you have suggestions about other themes you’d like to see, please let us know!

spices

And now a confession – this is my new favorite dinner recipe. I can’t believe that there was actually was a time when I didn’t really like cumin or curry; now they’re some of my staple spices.

This dinner is so easy and delicious. I like having a bit of crispiness to my chicken, but of course without all the fat that comes with frying and using oil. I coat the chicken with a variety of Indian-style spices and a little bit of plain bread crumbs – it locks in the juiciness of the chicken and provides for some excellent flavors.

I like to serve it with couscous, but it would also go well with steamed rice. Hope you enjoy it as much as I do!

chickencurry

Crisp and Juicy Curry Chicken

For couscous:
1/2 onion, diced
1/2 cup peas
1-2 cloves garlic
dash salt
whole wheat couscous

For chicken:
1 lb chicken breast, sliced in half lengthwise
1/2 teaspoon cumin
1 teaspoon yellow curry powder
1 teaspoon coriander, ground
1/4 teaspoon brown mustard seeds
1/4 teaspoon ground turmeric
1/4 teaspoon red curry powder
1/4 cup plain bread crumbs
3 fresh basil leaves, torn into small pieces

Preheat oven to 400F. Combine spices for chicken in a small bowl and stir with a fork. Add chicken halves to a gallon Ziploc bag with a tablespoon of water. Add spices to bag and toss gently to coat the chicken (you could dredge the chicken to coat it, but I’ve found I get a much better coating when I use the Ziploc).

Bake chicken for 20 minutes until cooked through. While chicken is baking, saute onions in a small pan for 5 minutes until transcluscent. Cook couscous according to package instructions, toss lightly and add onions, peas, garlic and salt. Cover and keep warm until chicken is ready.

You’re looking at day five of our Rainbow Week series. Click here to start on day one.

Rainbow Week is running strong with day five and what a ride we’ve had. We’ve done baked goods, we’ve done fruits; how about a main course? That’s right folks, we’re giving you the full gamut! Of course, I’d be remiss if we did something easy. I mean, sure, I could just boil some colored pasta, throw in some cream sauce and call it a day; but that’s not why you come here, right? Didn’t think so.

Tarragon

Now, my health-obsessed mind just wouldn’t be happy unless our rainbow dinner was healthy. So, we’re going with salad, but a different kind of salad. I’ve never been one for seafood, but my mother recently returned from a trip to Alaska with a cook book for me and, apparently, if there’s one thing you can get a lot of in Alaska it’s seafood (I guess it has something to do with all the water or the sub-freezing temperatures). No cookbook should just sit collecting dust so I decided to broaden my horizons.

Radicchio

Lettuce provides the green, radicchio the purple, salmon the red and lemon the yellow. I like this dish because it has a low skill requirement, which is great for my seafood newbie-nees. I tried adding corn for the yellow at first but this really didn’t work out. Instead, go with lemon over lemon juice for a more visually appealing effect. Note, that this is a LOT of salmon I used in the picture below. This amount could easily be split between two for a lighter dinner.

Poached Salmon Salad with Honey Vinaigrette

Poached Salmon Salad with Honey Vinaigrette
Adapted from What’s Cooking, Alaska?
1 cup water
1/2 cup dry white wine
2-3 sprigs of tarragon; leaves removed
6 peppercorns
1 lemon cut into quarters
1 salmon fillet
1 quarter radicchio; sliced thin
Several handfuls of salad greens (I used romaine and spinach, but mesculn would work great as well).

Throw the water, white wine, tarragon stems, peppercorns and lemon into a large pan or pot and bring to a boil. Simmer covered for 10 minutes to reduce (if too much boils away, just add more water). Add your salmon fillet and simmer, covered, for an additional 10-12 minutes. Remove from heat, uncover and let the fillet cool. Once cool, wrap in plastic and chill for 1-2 hours or until ready to serve.

While chilling, prepare your salad greens along with our earlier honey vinaigrette recipe using the tarragon leaves from earlier (chopped). Once ready, top your salad with your salmon and spoon as much dressing atop as you’d like. Enjoy.

If you’re like me, time seems to disappear much faster in the summer time. Not only is there more to do when you’re not holed up in your room, but this whole more-hours-of-sunlight thing just catches me off guard. One moment I’m frittering about at 6 in the sun and then next thing I know it’s 8:30 and the sun is still out. You’ve fooled me once again, mother nature.

Asparagus and Tomato Pasta

It just feels like you can do more when the weather is warm and the sun is shining and because of this things are busier and time flies faster. When this happens, it’s nice to have a quick meal recipe to fall back on. Asparagus season is in full gear right now which makes this recipe even more appealing (in season vegetables are just better). You can find asparagus in thick or thin stalks and I recommend the former for this recipe. The tomatoes “sauce” in this recipe doesn’t dominate your taste buds so the asparagus needs to step up.

Asparagus

Asparagus and Tomato Pasta
If you’re looking for a slightly more complex flavor, consider adding a teaspoon or two of pesto.

8 oz penne pasta
1 bunch of asparagus, woody stems removed and cut into 1-2 inch pieces
28 oz can of stewed tomatoes
1 garlic clove; minced

Cook the pasta per the instructions; probably 11 minutes in salted water. While the pasta is boiling, cook the garlic and tomatoes in medium-low heat for 5 minutes. Add the asparagus and cover; cooking until the pasta is ready while stirring occasionally.

When the pasta is ready, add to your tomatoes and asparagus. Remove from the heat and toss. Serve and enjoy.