Reader Request – Vodka Cream Sauce Using Fresh Tomatoes

A few weeks ago a friend contacted me about homemade vodka sauce. She happens to love it, and she and her significant other have a huge garden where they are about to come into a large surplus of tomatoes – something like two bushels of tomatoes a week!

blanched tomatoes

I had never made vodka sauce from scratch, but Edwin and I are always ready for adventure here on DinnerCakes.

tomatoes simmering

I unearthed a discussion thread about making vodka sauce from scratch on Chowhound. A few of the commenters had some interesting ideas about making it from scratch, and a number of others just suggested a combination of canned and fresh tomatoes to really get the best taste. For this first attempt I used only fresh tomatoes, but I agree that adding some canned tomatoes would probably make a bit of a fuller sauce.

vodka sauce

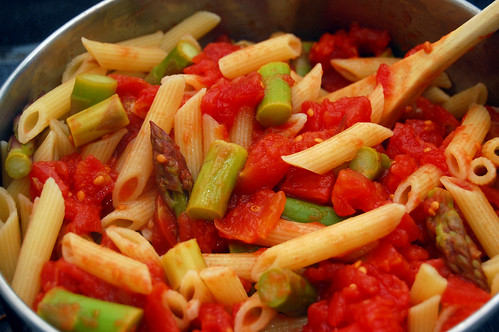
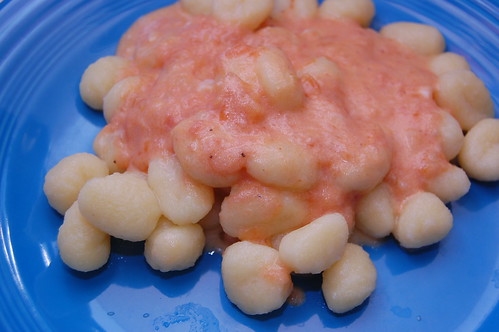
My sauce came out light and fruity, and I served it over gnocchi pasta. My husband and I both came to the realization that while we love gnocchi for the first few bites, we get a little bored with it towards the end. I think we might have enjoyed this more served over a different kind of pasta.

However, this is a good, lighter style vodka cream sauce that’s just right for summer! Please let us know if you have your own variation of vodka sauce using fresh tomatoes.

gnocchi with vodka sauce

Summertime Vodka Cream Sauce
inspired by Chowhound forum

2 fresh tomatoes
2 cloves garlic
1 tablespoon vodka
1/4 cup light cream
salt and red pepper, to taste

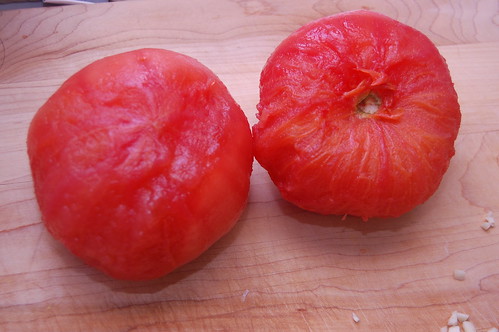
Wash tomatoes and make a few shallow cuts in the skin. Boil water, add whole tomatoes to boiling water for a moment, then remove and run cold water over them (ie, blanche tomatoes). The skin will now peel off easily. Peel tomatoes and set aside.

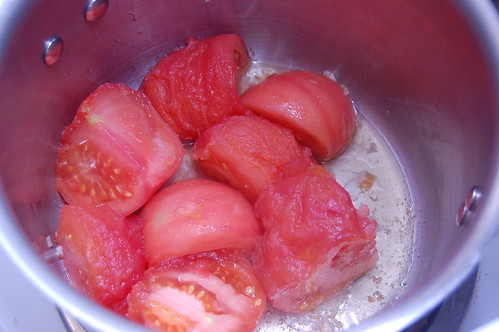
Heat a large pot and add a liberal amount of oil. Mince garlic and add to oil. Stir so that garlic does not burn. Quarter tomatoes and add to pot; simmer on medium heat.

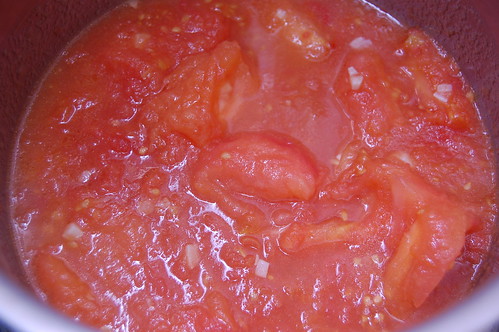
Continue to heat until tomatoes come apart. Stir occasionally and break apart tomatoes with a wooden spoon as they simmer. This process will take a little while until the tomatoes turn to a pulpy sauce. Continue to stir frequently while simmering so that some of the liquid boils off and the sauce thickens, about 20 minutes.

As the sauce begins to caramelize, add the vodka and stir well. Add the cream last, then sprinkle with salt and red pepper. Pour over pasta while warm.

Sometimes I consider quitting my my job in IT and working at Whole Foods. Why? Because of their tasty hot bar. Ok, I really wouldn’t quit my job, I like my job (usually), but I would like to acquire their recipes. I’ve had some good new experiences there. I had my first exposure to tempeh at Whole Foods and was quite a fan (you can look forward to something with that in the near future). So yes, this is another try-to-copy-whole-foods recipe.

Cauliflower and Spices

Whole Foods has this dish called Cracklin’ Cauliflower which I enjoy. Alliteration aside, I’m not sure why they call it that. It doesn’t strike me as cracklin’ at all, really. But then, what is cracklin’? How do you make something crack? Wait, what were we talking about?

Cauliflower and Peas with Spices

So yes, cracklin’ cauliflower is a subtly spicy dish that I like to get when perusing the hot bar selection. The spices say ‘Indian’ to me. with turmeric, fennel, and perhaps some curry. Another reason I like it is because, unlike many “true” Indian dishes, its ingredient list seems relatively smaller. Like last time, this dish isn’t what you find at your local Whole Foods, but delicious nonetheless.

Cracklin' Cauliflower - Sort Of

Cracklin’ Cauliflower

3 tablespoons oil
1 head of cauliflower; cut into equal size floret (larger pieces, cut in half)
1 yellow onion; diced
1 clove garlic; minced
1/4 teaspoon turmeric
1/2 teaspoon fennel seeds
1/2 teaspoon garam masala
1 teaspoon curry (I used half hot, half sweet)
5 tablespoons stock or water
1/2 teaspoon salt

Steam your cauliflower for approximately 7 minutes so that it still retains firmness. After a few minutes, saute your onion on medium high heat in a large frying pan or wok for 5 minutes.

Add all your ingredients; your cauliflower, peas, garlic, spices, stock and salt. Reduce to medium heat. The stock will help drop the temperature as well as make it easy to mix the spices evenly (otherwise it clumps up). Stir-fry until evenly mixed and the stock has boiled away; approximate 5 minutes. The cauliflower should still be firm. Serve and enjoy.

All righty! So now you know how to roast and peel a bell pepper. Time to put those fancy new skills to work. Hummus, as I’ve mentioned before, is easy to make and the order of steps is so flexible that it’s very easy to experiment with. AND it’s a great option for bringing something to a party (even when one of the hostesses of said party is a crazy foodie).

Ingredients for Fire Roasted Red Bell Pepper Hummus

Another great thing about hummus is that, if made with a strong flavor of its own, it can really work with a lot of different “scoops.” Sure pita and tortilla chips are the classics and they do offer some accent to the flavor; but they’re largely just edible spoons. As I type this, I’m eating some of this delicious hummus with celery (what can I say? I’m a calorie counter). Do not fall in societal constraints! Eat hummus freely, with whatever you have at your disposal!

Fire Roasted Red Bell Pepper Hummus

Fire Roasted Red Bell Pepper Hummus

1/4 cup olive oil
4 cups cooked chickpeas; drained
2 red bell peppers; roasted and peeled
2 medium garlic cloves; minced
1 1/2 teaspoon ancho chili powder
1/2 teaspoon paprika
2 teaspoons lemon juice
ground black pepper to taste (1/4 teaspoon or more)
1 teaspoon kosher salt

Add all ingredients but the oil into a food processor and start processing. Add the oil slowly until you reach the consistency you’d like. Add additional salt and pepper to taste. Enjoy.

The weather was beautiful this past weekend; gorgeous break in the rain we’ve been having lately. I had a special hope for this weekend because of some climbing plans and couldn’t have asked for a better Saturday. A group of us drove up to Seneca Rocks for a day of climbing the peaks. I had never been to Seneca before and it was an excellent experience. The view from 900 feet is… indescribable.

Peas!

As usual, when Sunday rolls around I’m drained and really don’t want to make anything involved; I want quick. I also want something that’ll give me plenty leftovers for the week and, hey while we’re at it, something not too pricey. Cabbage is cheap. Very cheap. McDonalds cheap; and, with a few spices and a little stir fry action, tastes much better. This is really more of a side dish than a main dish, but honestly, when I’m feeling lazy I’ll just eat a ridiculous amount of a side dish to avoid the effort (don’t judge me).

Shredded Cabbage Stir-Fry with Green Peas

Shredded Cabbage Stir-Fry with Green Peas

1 head green cabbage; cored and shredded
2 cups frozen green peas; thawed
1 serrano chili (or any small, hot chili); minced
6 tablespoons oil
1 3/4 teaspoons cumin seeds
2 bay leaves
1/2 teaspoon ground turmeric
1/4 teaspoon cayenne pepper
1/4 teaspoon curry powder (hot or sweet)
1 teaspoon sugar
1 teaspoon salt
1/2 teaspoon garam masala

Heat a large pan or wok to medium heat and add oil (swish around if in a wok). Let the oil heat up for a few seconds then add the turmeric and bay leaves. Cook only for a few seconds until fragrant (too long and it burns) then add cabbage and green peas. Cook, tossing occasionally, for one minute to coat the cabbage and vegetables in oil.

Add the turmeric, cayenne and curry powder; tossing to coat. Stir fry for five minutes until the cabbage begins to soften but still maintain some crisp. Be sure to toss on occasion to prevent burning and ensure even cooking (if you like your cabbage with a bit more crisp, stir a bit less often). Add the chili pepper, sugar, salt and garam masala and cook for a minute.

If you’re like me, time seems to disappear much faster in the summer time. Not only is there more to do when you’re not holed up in your room, but this whole more-hours-of-sunlight thing just catches me off guard. One moment I’m frittering about at 6 in the sun and then next thing I know it’s 8:30 and the sun is still out. You’ve fooled me once again, mother nature.

Asparagus and Tomato Pasta

It just feels like you can do more when the weather is warm and the sun is shining and because of this things are busier and time flies faster. When this happens, it’s nice to have a quick meal recipe to fall back on. Asparagus season is in full gear right now which makes this recipe even more appealing (in season vegetables are just better). You can find asparagus in thick or thin stalks and I recommend the former for this recipe. The tomatoes “sauce” in this recipe doesn’t dominate your taste buds so the asparagus needs to step up.

Asparagus

Asparagus and Tomato Pasta
If you’re looking for a slightly more complex flavor, consider adding a teaspoon or two of pesto.

8 oz penne pasta
1 bunch of asparagus, woody stems removed and cut into 1-2 inch pieces
28 oz can of stewed tomatoes
1 garlic clove; minced

Cook the pasta per the instructions; probably 11 minutes in salted water. While the pasta is boiling, cook the garlic and tomatoes in medium-low heat for 5 minutes. Add the asparagus and cover; cooking until the pasta is ready while stirring occasionally.

When the pasta is ready, add to your tomatoes and asparagus. Remove from the heat and toss. Serve and enjoy.

I really really (really) love this time of year. Not only do I hate the cold, but there is so much more to do in the warmth. Hiking, climbing, swimming, the list goes on. Edwin was not meant to be contained indoors! The only issue I have with the summer is the shift towards colder meals. Don’t get me wrong, I enjoy a good salad, but otherwise I prefer my dinners hot.

Chopped English Cucumber

Of course, I try to keep an open mind so I thought I’d give a cold soup a shot. English cucumber is a seedless variety of cucumber that has an edible skin and is often considered less bitter than most. It’s also friggin’ long; several feet. It’s the most common ingredient in a cold cucmber soup, today’s dish. The major ingredients are the cucumber (duh), dill and yogurt. I decided to add corn and tomato because, well, I like a soup with substance and a pureed soup makes me feel like I’m eating water.

Dill Fronds

This is definitely not the most appealing-looking soup I’ve made, but appearances can be deceiving. It’s got a light flavor and the cucumber and yogurt combine surprisingly well. On top of that, this is one of the few soups that calls for little to no salt. Oh, and did I mention it’s by far the easiest soup I’ve ever made? Give it a shot and let us know what you think.

Chilled Cucumber Soup

Chilled Cucumber Soup
Feel free to substitute the shallot with garlic, onion or scallions.

1 english cucumber; chopped
1 small or medium scallion; minced
1 handful dill fronds
2 cups yogurt (regular works fine, but consider greek if you’d like a thicker consistency)
1 cup corn kernels
1 plum tomato; diced
Salt and pepper to taste

Add all ingredients except the corn and tomato into a blender. Blend until smooth. Serve with the corn and tomato on the side as a “garnish.” Enjoy.

A Secluded Cabin In The Woods, A Good Book and Home Fries

You may have picked up (or not!) that I’ve been a wee bit quiet around here the last few days. My husband and I took the opportunity last week to abscond for a mini vacation.

cabin

It had been a while since we went anywhere for more than a long weekend. It’s just been a busy year, and it’s rare for all the stars to align so that we’re able to make plans in advance.

tree

We rented a cabin in West Virginia at Lost River State Park. The park was recommended to me by a co-worker, and it sounded like just the kind of low on planning/high on relaxation trip that we needed.

halfway up the mountain

The mountains in West Virginia are truly gorgeous. Typically we do our mountain trips to Douthat State Park or Warm Springs, VA, which are excellent, but the mountains in West Virginia just seemed endless. Rain was really only intermittent, and the weather behaved at a perfect 70-75 degrees.

side of a mountain

If you like the mountains, cabins at state parks really are the way to go. If you’re a technophile you might go mad (no television, no cell phone reception, no internet), but the cabins are inexpensive, well-maintained and generally spacious. The cabins we’ve stayed at have fireplaces, bedding and towels and a fully functioning kitchen with a stove, fridge, microwave, pots and pans and utensils.

five counties

I’ll throw out another plug while I’m at it – if you’re looking for something a little less rustic, on our last night in West Virginia we ate at a nice restaurant attached to a gorgeous inn with great mountain views – The Guest House at Lost River. The owner encouraged us to walk around and explore the property after our meal. It was beautiful and the rates are pretty reasonable for how nice it is. There’s not much in vicinity, but I thought my husband broke it down nicely, “if you just want to chill in opulence, it’s your place.”

handm

Getting back to cabins – because you’re in remote regions, cooking your own food is usually the only game in town. There was nearby no grocery store to run to for eggs and milk, but luckily we picked up a few things before we left. I was able to throw together some curried home fries for brunch one day.

potatoes

I just don’t buy into the idea that meals need to be complicated or time consuming to be good. I have a great memory of enjoying brunch at a friend’s house a few years ago – omelets, home fries with rosemary and thyme and mimosas.

chopped potatoes

I tried to pack only a few spices so that I wasn’t carrying the entire kitchen with me, so we brought salt and pepper, curry powder, cayenne, Nature’s Seasoning and paprika. I cubed two russet potatoes into 1 inch pieces and seasoned them generously. I cooked them for about 20 minutes in the cabin’s heavy cast iron skillet; they probably would have cooked faster if I had covered them. Whether you’re vacationing in the mountains or enjoying brunch with mimosas, home fries are a delicious addition.

smoking potatoes

Lost River Home Fries

1 medium onion, diced
2 russet potatoes, washed and cubed
non-stick cooking spray
salt and pepper, curry powder, cayenne, Nature’s Seasoning and paprika as desired

Heat large skillet to medium temperature and spray with non-stick cooking spray. Dice onion and add to skillet. Wash potatoes well, cut into thin slices and cube. Add potatoes to skillet about 2 minutes after onion. Add seasonings and stir potatoes frequently so that they don’t burn or stick to the pan. I was most heavy handed with the curry powder and salt.

Cook for about 20 minutes, or shorter if your skillet has a cover (if you have a cover, cook for half the time covered and half the time uncovered). You should be able to pierce the potato with a fork without resistance. Season with a little extra curry powder and salt on top before serving, as some of the spices do get cooked away.

Thanks to everyone who gave us feedback on the new design. The response has been overwhelmingly positive and we’re proud to say it’s a success. As always, we love hearing from you, so feel free to let us know anytime you have something to say. We’ll keep innovating in DinnerCakes land, so keep your eyes peeled for changes down the road.

Cut Green Beans

As usual, my weekend was packed with things to do. You’re running around all week and then next thing you know it’s 5pm on a Sunday, you haven’t finished your laundry, dishes have stacked up and you’re very hungry. Enter my glorious quickie-fallback: stir fry.

Stir Fried Green Beans with Bell Pepper

Green beans should be in peak season for most people as well as green peppers. I decided to take these as my focus for this side dish. It’s ingredient list is short, but may use more ginger than you’re use to. There’s a style of cooking called Kan Shao, which means “dry cooked” – no stock or water. It’s a bit different than most stir fries, but I liked it.

Grean Bean and Green Bell Pepper Stir Fry with Ginger

Green Bean and Green Bell Pepper Stir Fry with Ginger

2 tablespoons oil
1/2 lb green beans
1 green bell pepper
ginger cut into 56 1/4×2 inch matchsticks
1 tablespoon soy sauce
1 teaspoon sugar

Trim the green beans and cut in half. Cut your green bell pepper into half inch matchsticks. This doesn’t work out too well for the top and bottom of the pepper but go ahead and throw them in with whatever shape you can get.

Heat your wok to high heat and add your oil, swishing (carefully) to coat. As soon as the oil begins to smoke, add the green beans and bell pepper and stir fry for 2 minutes. Transfer everything to a plate. Heat the additional tablespoon of oil and add the ginger, stir frying for one minute. Add the green beans, bell pepper and additional ingredients. Stir fry for 2 minutes and serve with salt and pepper. Enjoy.

Maybe it’s my engineering background or the way I was raised, but I hate wasting food. Whenever I have leftover ingredients I try to think of some way to use them. Often, I roast them, trying some new combination of herbs and/or spices, hoping for some new successful discovery (they’re all discoveries, just not all great ones). Even if it doesn’t become a big hit, I feel better knowing I used all I could. What can I say? I like efficiency.

Chickpeas

Last week I posted a recipe with chickpeas and if you used canned, then you probably had half a can leftover. That’s where this recipe comes in. Roasted chickpeas can be a great crunchy food to snack on. At the base, there’s just oil and a bit of salt; but you can easily experiment with other herbs or spices to see what you get.

Turmeric and Cumin Roasted Chickpeas

Cumin and Curry Roasted Chickpeas
This recipe is for two cups cooked chickpeas, but can easily be scaled down.

2 cups chickpeas; cooked, rinsed, drained, dried
1 tablespoon oil
1/2 teaspoon curry powder
1/4 teaspoon ground cumin seed
1 pinch of salt

Preheat your oven to 450. Combine all the ingredients and place in a aluminum foil-lined roasting pan. Roast in the oven for 35-40 minutes, shaking the pan occasionally so the chickpeas brown (relatively) evenly.

Remove from the oven and let cool for a few minutes and (optionally) add additional salt to taste. Chickpeas should be crunchy. Enjoy.

Heather and I tend to talk about food pretty often; so often in fact that we have rules. One of the more recent ones is no talking about food before noon. Why? Cravings. When you’ve got a craving for baked goods or something loaded with cheese at 10am in the morning, you’re in trouble. Wednesday’s craving (albeit not at 10 in the morning, thank god) was fries. Some cravings cannot be denied.

Adobo Seasoning

Maybe it’s the whole swine flu thing, but I felt like taking this cravings in the Mexican direction (bet you didn’t see THAT coming!). I’ve never actually heard of Mexican fries though so I decided to make up my own. Overall, I felt the seasoning was mild until I added a spritz of lime. Don’t ask me why, but that addition definitely made it a winning combination.

Mexican Potato Wedges

Mexican Potato Wedges
This recipe is is only for one potato, so be sure to scale it up when considering how many people you’re serving.

1/4 teaspoon onion powder
1/4 teaspoon chili powder
1/4 teaspoon oregano
1/2 teaspoon paprika
1/2 teaspoon cumin
1 garlic clove; minced
a pinch red pepper flakes
a pinch cayenne (optional, for a bit more kick)

1 tablespoon oil
1 russet potato
1 lime

Preheat the oven to 375. Mix all your spices and garlic together in a small bowl and set aside. Wash and dry your potato then cut it into eights wedge then cut each wedge in half. Throw your wedges, oil and spices together and mix until well combined.

Place your wedges on a baking sheet covered in foil and roast for 35 minutes; tossing halfway through. Your wedges should be browned. Remove from the oven and let cool for a few minutes and serve with a spritz of lime juice. Enjoy.