
How about this for a Valentine’s Day treat?

Martha Stewart’s Valentine’s Day Peanut Butter Cups.
Please send some my way??
How about this for a Valentine’s Day treat?
Martha Stewart’s Valentine’s Day Peanut Butter Cups.
Please send some my way??
Well, my town is gearing up for a snowpocalypse beginning Friday afternoon. The National Weather Service is calling for at least 12 inches in my area, with a good chance of 20. Eep! So we’d better get out a list of some super bowl ideas early then so that you can do your shopping!
Dips
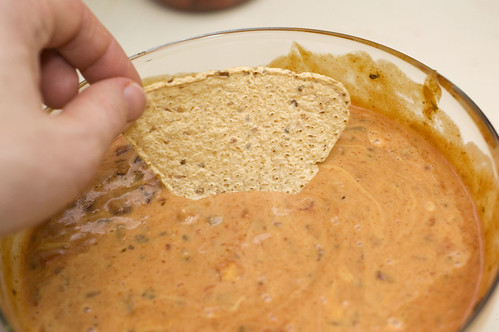
Uncle Rich’s Awesome Cheesy Chili Dip
Cream Cheese Spinach and Artichoke Dip
Fire Roasted Red Bell Pepper Hummus
Potential Super Bowl Grub
Shredded Chicken Tacos with Homemade Salsa (from Slow Cooker Week)
Vegetarian Tostada With Not So Refried Beans
Mexican Potato Wedges
Baked Mac & Chicken with a Kick
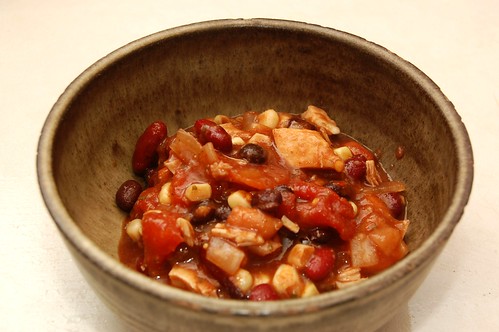
Sante Fe Soup with Chicken, a Super Bowl Favorite
Taco Salad with Drunken Black Beans
One of our many pizzas – including Chicken & Roasted Red Pepper Pizza, Pesto Pizza, Pita Pizzas, English Muffin Pizzas, Spinach and Mushroom Pizza and Garlic Goat Cheese Pizza with Asparagus and Cauliflower
Desserts
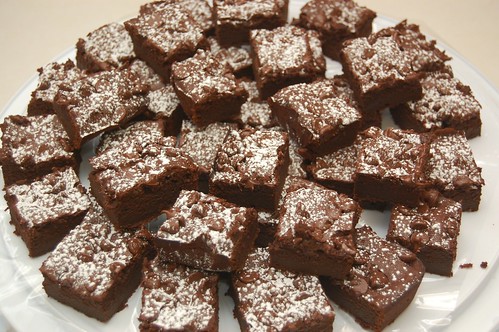
Guinness Stout Brownies
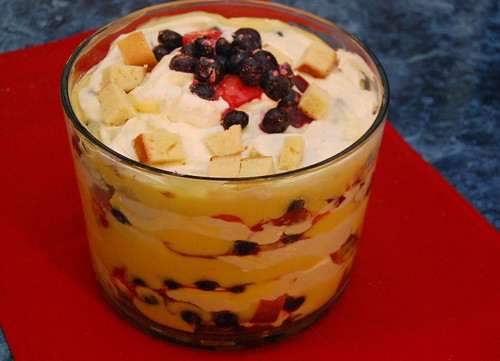
Red, White and Blueberry Trifle (also see Assembling a Trifle)
Mocha Fudge Brownies with Peanut Butter Frosting
Secret Ingredient Coconut Cupcakes with German Chocolate Cake-Style Coconut Frosting
My eyes aren’t fully undilated, so please forgive any typos or bizarre things contained within this post. I feel fairly cross-eyed!
So the other day I was thinking about things I could make for dessert that aren’t so heavy. I came back to my old favorite, the red, white and blueberry trifle. However I realized after looking through this post that I was rather vague with the assembly. So why don’t we walk through that a little better?

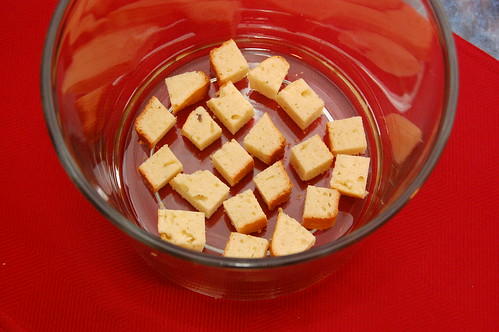
First bake and cool a delicious vanilla pound cake. My favorite for trifles remains the Double Vanilla Pound Cake from The Art & Soul of Baking.
I let my pound cake cool, wrapped it in foil and let it sit overnight so that it wouldn’t crumble when putting together the trifle.
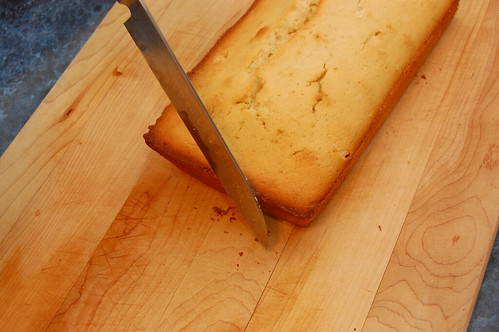
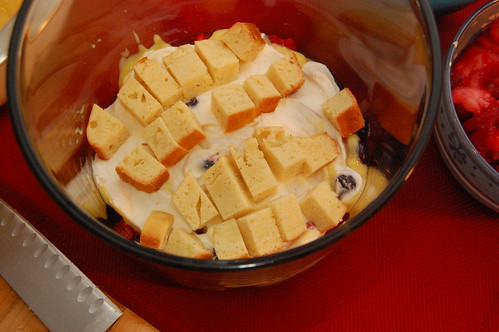
Next, gently trim away any crusty edges.

Cut the pound cake to one inch slices.

And I like to eat the end pieces…

Cut each slice in half long ways.
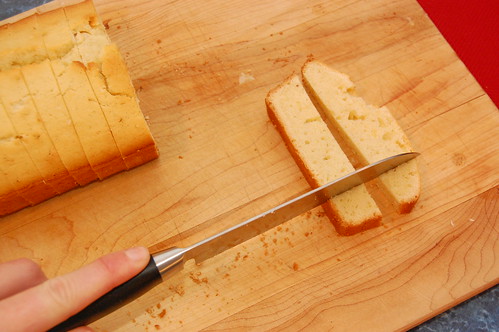
Then cube it.
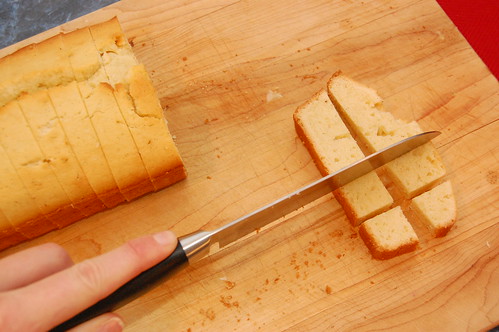
We’re going for 1/2 inch to 1 inch cubes.
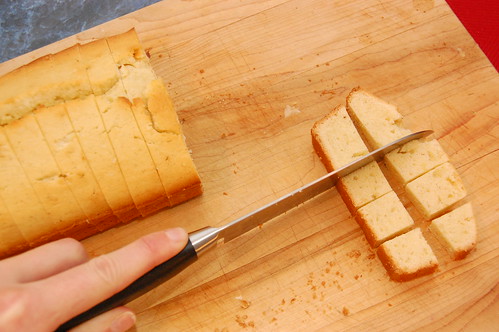
You could also cut two slices at once to save time if you wanted.
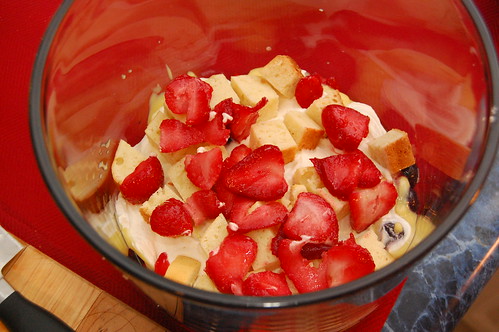
Arrange your first layer at the bottom of the trifle bowl. Use about two slices of pound cake in each layer.
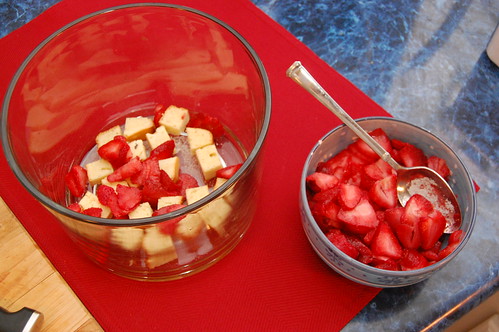
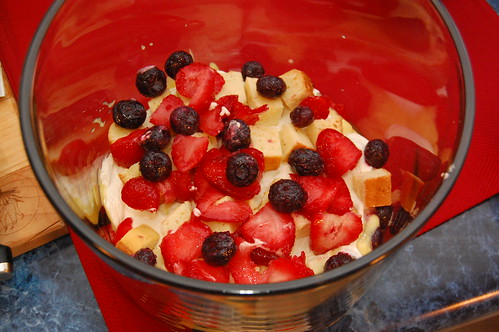
Add a layer of sliced strawberries over the pound cake. Because basically no fruit is in season right now, I used frozen strawberries and frozen blueberries.. which are frozen in their prime anyway. While cooling the pound cake the night before, I also sliced the strawberries and moved my fruit to the fridge overnight to thaw.

After strawberries comes blueberries. You should have sprinkled your fruit with a bit of sugar while it thawed overnight. After adding the fruit to the trifle bowl, feel free to sprinkle additional sugar.
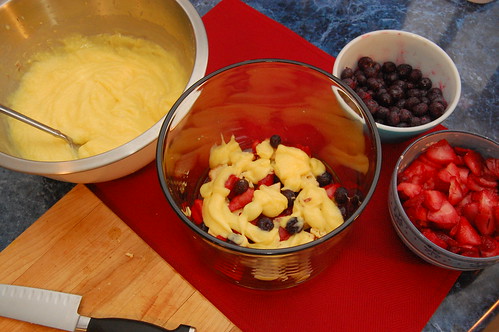
After fruit comes pudding. I used two small boxes of fat free/sugar free vanilla pudding. To make the pudding you mix each packet with two cups of cold milk, whisking for about 2 minutes. The pudding will set in about 5 minutes.
A layer of fat free Cool Whip will even out the cake and fruit.
So pound cake, strawberries, blueberries, a sprinkle of sugar, pudding and Cool Whip is the routine. After the Cool Whip you begin your layer again.
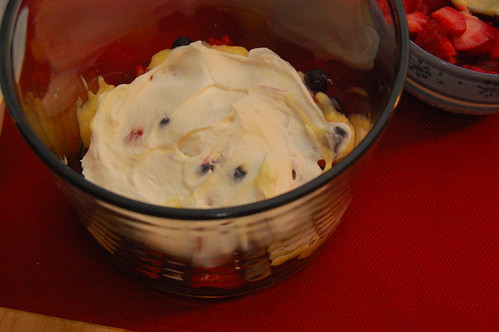
Lots of people like to get fancy here, arranging each strawberry slice individually. Ghost Baker refuses to indulge this level of detail!
Rustic arrangements keep me sane.
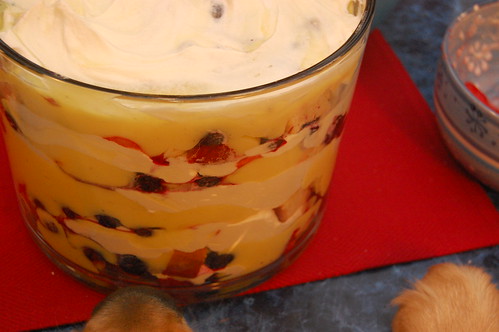
Do you notice anything that doesn’t belong in this photo? Prying noses and paws, perhaps?

Once you’re done with your layers, you can get decorative at the top… making lovely fruit arrangements, adding dollops of Cool Whip, coconut, nuts or other kinds of fruit.
If you’d like your cake to get a little softer and let the pudding and Cool Whip seep in, prepare this early and chill it until it’s time to serve. If you’re firmly against softened cake, then prepare just before serving. I enjoy the pudding-laden cubes of cake, so I prepare mine several hours before serving. Enjoy!
Good morning! I hope you had a great Halloween. I spent much of the day watching scary movies, reformatting my computer from Vista to Windows 7 and going to bed by 10:30 PM in order to be up at 5 AM for an early hospital shift – riveting, I know!
You’ve probably had enough of Halloween candy and sweets for a little while (I haven’t, but the scale says otherwise), so this recipe should help if you need some detox along the way.
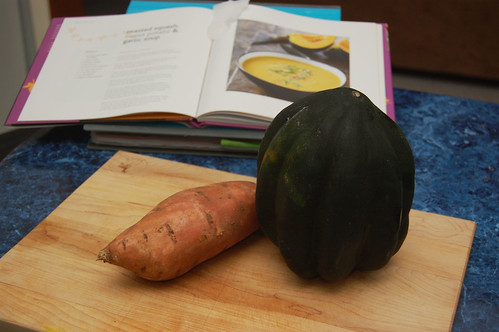
The other day I made an Acorn Squash & Sweet Potato Soup. It’s a little bit sweet and very tasty. It would make a great appetizer soup for a Thanksgiving dinner party to introduce the meal, or you can have it for weeknight dinner and enjoy the leftovers for a few more nights (like my husband and I did).
I changed a few things from the original recipe including leaving out shallots and chives. Because the squash and sweet potato would already be sweet, I didn’t want to introduce the sweet onion shallot flavor as well. Shallots can also be a little expensive.
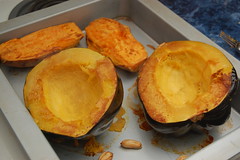
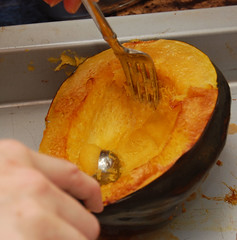
I’d never worked with acorn squash before this actually, and it’s very easy. My trick to scoop out the insides after roasting the squash was to use a melon baller – the squash flesh came apart easily and without a lot of mess.
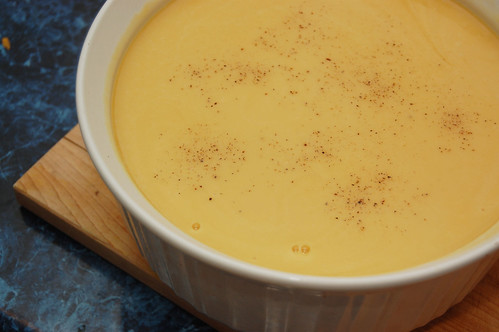
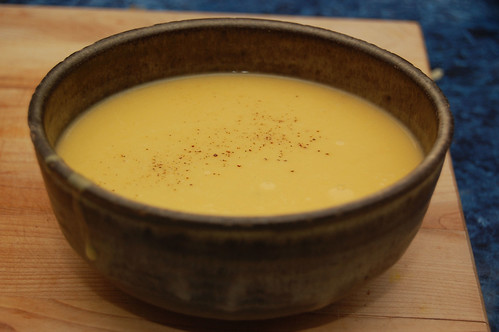
Sprinkle with fresh ground pepper to garnish.
1 large sweet potato
1 medium acorn squash
2 tablespoons olive oil
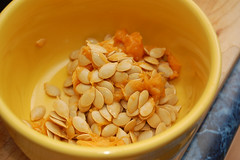
6 cloves garlic, unpeeled
3 3/4 cups low sodium chicken broth
1/2 cup light cream
salt and pepper
Preheat oven to 375F.
Cut sweet potato and squash in half lengthwise. Scoop out squash seeds and brush cut sides with oil
Place cut squash and sweet potato halves cut-side down in a shallow roasting pan (I used an old brownie pan). Add unpeeled garlic cloves around the vegetables. Roast for 40 minutes until tender.
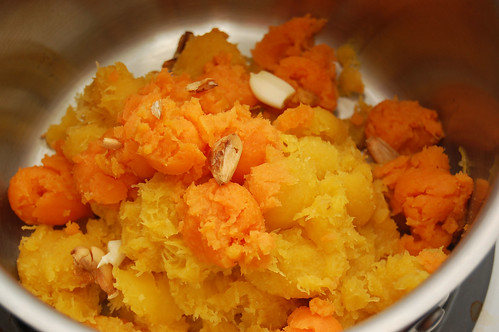
When cool, pin down one end of the squash with a fork and scoop flesh (ie, the insides) from potato and squash with a melon baller, leaving the skins behind. Peel garlic and add soft insides and scooped flesh to a large saucepan.
Add the chicken broth and a dash of salt. Bring to a boil, then reduce heat and simmer, partially covered, for approximately 30 minutes, until vegetables are very tender. Stir occasionally.
Cool slightly and transfer to a food processor or blender and process until smooth. Work in batches so that you do not overflow your machine. If using a food processor, strain off the cooking liquid and reserve. Process the veggies with only enough liquid to moisten it, then combine with remaining liquid when fully processed.
Return soup to rinsed pan and stir in light cream. Season with salt and pepper and simmer for 5 minutes or until heated through. Garnish as desired and serve!\
This past weekend I went to a very lovely wedding in Richmond. The flowers were gorgeous, the bride’s dress was amazing, and one of the first things to catch my eye were two pumpkins being used as beer coolers on the bar.
Now that’s amazing. If you’re planning a Halloween party or, hey, hosting Thanksgiving this year, you must have these! Things like this make me wish I’d had a fall wedding.
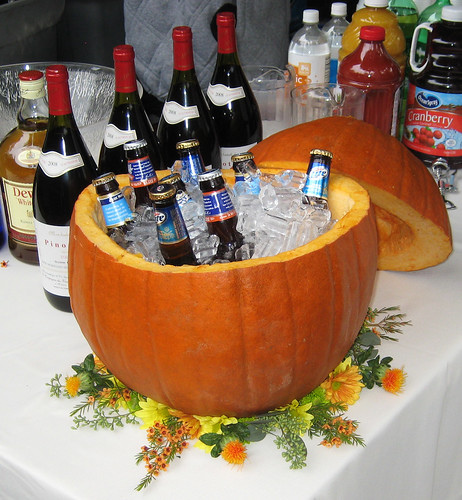
Of course Martha Stewart has also thought of this very cool use for pumpkins. On her site she instructs:
Just choose a large, wide pumpkin, cut off the top third with a serrated knife or keyhole saw, and scrape out the pulp and seeds. Line the gourd with a glass or plastic bowl to prevent it from becoming water-logged. If the pumpkin opening is a bit too small for the bowl, carefully shave the inside edge with a spoon. Finish by filling the bowl with ice and bottled drinks.
I didn’t notice a glass bowl inside the pumpkin cooler at the wedding, so maybe you could get away with not using it. Especially if you’re using the pumpkin coolers outdoors, the cold air will keep any ice from melting and water-logging the pumpkin.
If you saw our tips two weeks ago on preserving jack-‘o-lanterns, then you read that pumpkins like to be nice and cold.
Good luck – and please send us photos if you pull it off!
Everyday Food just posted some great Halloween treat ideas. Some of them I wouldn’t go anywhere near – personally I’m not a fan of making food look gory, though I think Edwin appreciates it. Check out –
Ghostly Bat and Cat Cookies (requires cookie cutters)
Ladies’ Fingers (yeah, you won’t see me making this one…)
Brain Cupcakes
Boo-tiful Cake (they’ve had this one around since last Halloween, but I absolutely love it!)
I Scream Sandwiches (very cute and yummy looking)
Ghoulish Petit Fours
Haunted House Cake (for the master decorator!)
Brownie Coffins (what can I say?)
Jack-‘o-Lanterns with Sorbet
What about a spooky dinner? How about –
Mashed Boo-tatoes
Spicy Batwings
Baked Rigaboney (I really couldn’t make these names up myself)
Ladies’ Fingers and Men’s Toes (this may be the worst looking of all!)
Finish off your party with some creepy cocktails!
Bloodthirsty Marys
Swamp Sips
Eyeball Highballs
Shrunken Heads in Cider (nope, THIS is the worst looking one of all!)
OoooOOooo! That’s me making a spooky ghost noise…

My favorite pumpkin ale is “pumking Imperial Pumpkin Ale” by Southern Tier Brewing. It’s a pretty rich beer, much like eating a slice of pie. But check out this awesome description from the label:
“Pumking is an ode to Púca, a creature of Celtic folklore, who is both feared and respected by those who believe in it. Púca is said to waylay travelers throughout the night, tossing them on its back, and providing them the ride of their lives, from which they return forever changed! Brewed in the spirit of All Hallows Eve, a time of year when spirits can make contact with the physical world and when magic is most potent. Pour Pumking into a goblet and allow it’s alluring spirit to overflow. As spicy aromas present themselves, let its deep copper color entrance you as your journey into this mystical brew has just begun. As the first drops touch your tongue a magical spell will bewitch your taste buds making it difficult to escape. This beer is brewed with pagan spirit yet should be enjoyed responsibly.”
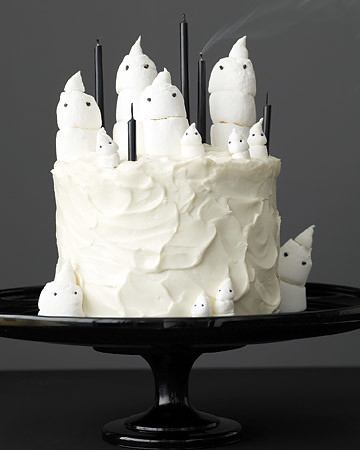
Are you going to argue with a description like that? Heck no! But if you’re needing something a little more kid friendly, how about ghost cupcakes?
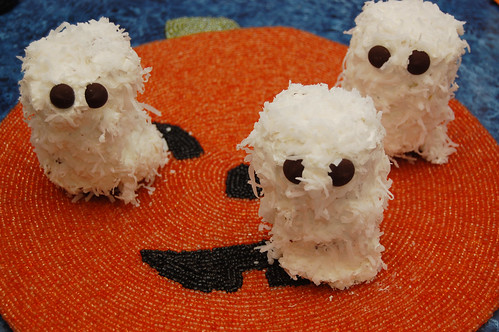
Break out your favorite Devil’s Food Cake recipe, or try Martha’s and cut it in half to make 12. Remember that how many cupcakes you make will be cut in half, because you’ll be stacking two cupcakes to make a ghost. Yes, you can use a box recipe, too.. just don’t tell Edwin!
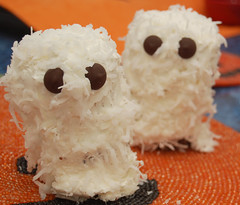
Bake your cupcakes, cool completely, remove from wrappers and set in the freezer for a few minutes to firm them up. In the meantime, whip up a nice white frosting like Martha’s Fluffy Vanilla.
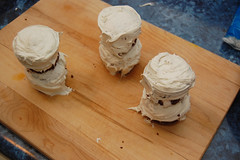
When the cupcakes have firmed up a bit, frost the top and sides of each cupcake with a thin layer (using more on top) and then carefully stack two. Set back in the freezer for 10-15 minutes, making sure that they don’t topple over (you may use one toothpick in the center for added support, but if these cakes are meant for kids then you’ll want to be careful!). Don’t worry if your frosting is all crumby at this point – you’re just making a crumb coat.
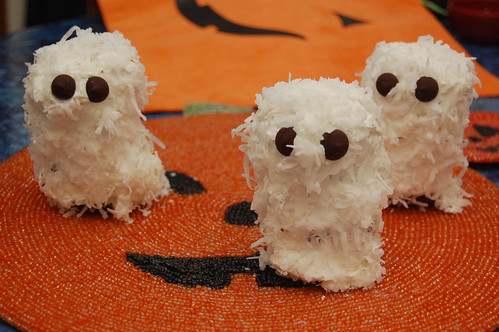
When frosting has set, remove from freezer and apply your final layer of frosting so that the cakes are completely covered. Cover the cakes with a layer of shredded coconut (which also helps hide any frosting imperfections that you were unable to get out). Add two bittersweet chocolate chips for eyes – if you’re having trouble getting them to stick just add a little frosting to the back. Use caution when transporting. Keep refrigerated until serving.
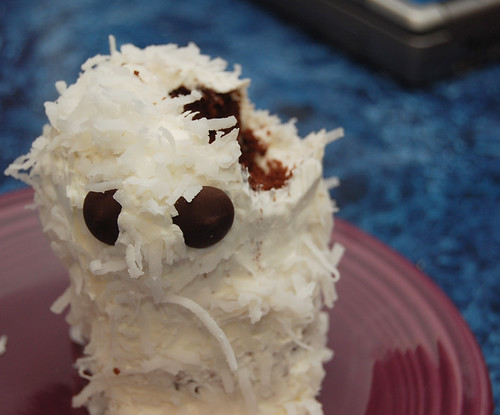
Note: My husband thought that these little cakes also somewhat resembled owls – I don’t see you couldn’t add a nice candy corn beak if you’d prefer to showcase owls instead of ghosts. But to make them more ghost like, make sure you put the eyes closer together.
Thanks to Jen for sending me these creative pumpkin recipes from Better Homes and Gardens. I’d like to try all of them, but here are some that looked best to me:
Pumpkin-Filled Cream Puffs with Maple-Caramel Sauce,
Pumpkin Sandwich Cake,
Spiced Pumpkin Dunking Sticks,
Pumpkin-Cherry Upside-Down Cake,
Pumpkin Fudge,
Pumpkin Pie Drops,
Pumpkin Tiramisu,
No-Bake Pumpkin Swirl Cheesecake,
Pumpkin Bourbon Pudding,
Pumpkin Bread Pudding with Toffee Sauce,
Pumpkin Spice Whoopies
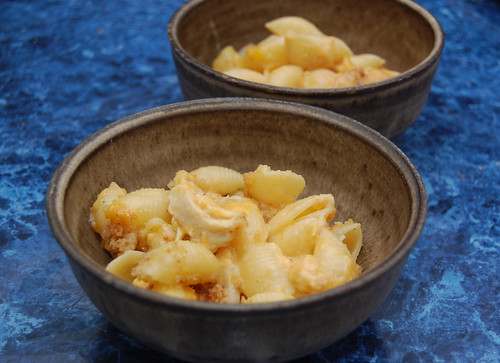
On Tuesday I told you all that I bought some fancy local cheese and made a great burger – well I still had a lot left, so I was brainstorming things to make.
I remembered something I read by Martha Stewart that suggested using sharp, pungent cheese when making macaroni and cheese because, not only does it add some more pizazz and a grown-up twist, you also apparently fill up faster and so eat less (for a mac & cheese-aholic like me, this is great news).
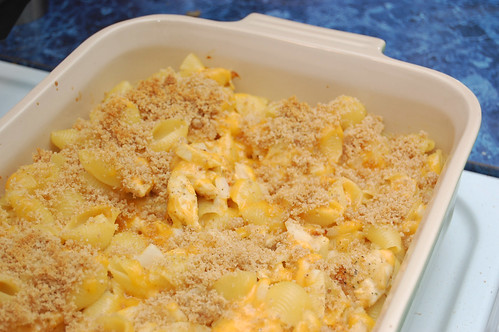
But I couldn’t just do mac & cheese either. I decided to try to recreate my favorite thing on the menu from my old haunt in Pittsburgh, PA – Rock Bottom Brewery‘s mac & chicken. I’m happy to report the result was pretty awesome.
I adapted a great mac & cheese recipe from Alton Brown. If you use your time wisely and do a few things at once (e.g. start boiling the water for pasta once the chicken is halfway done) you’ll find that it doesn’t take you that long. This is something great to make early in the week or on Sunday night and have it last for several days.
1 pound boneless skinless chicken breast
1 pound shell pasta (small shells, not the kind used for stuffed shells)
3 tablespoons unsalted butter
3 tablespoons flour
1 tablespoon powdered mustard
2 cups milk (I used skim because that’s what we have on hand)
1/2 cup yellow onion, finely diced
1 teaspoon paprika
1 large egg
10 ounces sharp cheddar, grated
1/2 ounce Red Dragon cheese (Click here for my blurb about this spicy peppercorn and brown ale cheese; if you can’t find it, pick another melting cheese that has some bite!)
1 teaspoon kosher salt
fresh black pepper
Topping:
2 tablespoons unsalted butter
1 cup plain bread crumbs (Panko are better, but use what you have)
Preheat oven to 425F. Trim the fat from your chicken and cut in half longways. Set on a baking sheet and season generously with paprika, salt, pepper and a little Montreal Chicken Seasoning. Bake for 20 minutes.
To make the best use of your time, as soon as you put the chicken in the oven dice the onion, shred the cheese and measure out your ingredients. When chicken is halfway done, set a large pot of water to boil for the pasta and add pasta once it’s boiling. While you’re heating up the water and the chicken is still in the oven, set a medium size pot on the stove and melt the butter. Whisk in flour and mustard powder – keep the mixture moving. When it’s lump-free, stir in milk, onion and paprika. Stir frequently for about 5 minutes.
The chicken should be done by now, so set it aside to cool and turn down oven to 350F.
Temper the egg slowly, then stir in 3/4 of the cheese. Season with salt and pepper, then fold the cooked pasta into the mixture. Shred cooked chicken or cut it into small pieces and incorporate with the pasta and mixture. Pour into a large casserole dish and top with remaining cheese.
Melt the butter for the topping in a small saute pan and toss the bread crumbs to coat. Sprinkle over pasta and bake for 30 minutes. Let cool for a few minutes before serving.
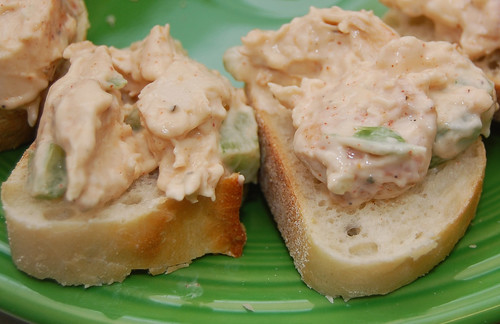
So recently I wanted to create a really great light chicken salad. I know Edwin and I mention the grocery store in our hometown all the time, Ukrop’s, but they really do have great light chicken salad. Sadly the store bought chicken salad I tried at Harris Teeter in Northern Virginia was, well, gross!

This is not the spectacular replica I was hoping for, but it’s a start. I read some forums where others have tried to recreate it, and it seems that the only ingredients used are chicken, celery and mayonnaise. Since it’s labeled “light” chicken salad in the store, I assume that means a low fat mayo is used. I used fat free Miracle Whip in place of mayo, and it didn’t knock my socks off.
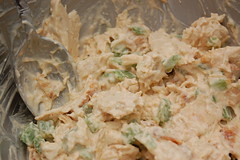
I’d really love some help on this recipe if any of you have suggestions or recommendations! I know it’s easy to go wild with chicken salad recipes (adding nuts, cranberries, etc.), but I’d really just like something very basic. What do you think?
1 lb. boneless, skinless chicken breast
2 stalks celery, diced
1/2 to 1 cup of fat free Miracle Whip
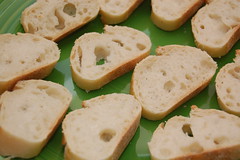
1 baguette
paprika, salt, black pepper and cayenne to taste
Preheat oven to 400F and bake chicken (seasoned with spices above) for 20 minutes. Cut celery while chicken is cooling.
When chicken is cool, use a fork to shred. Combine shredded chicken, diced celery and Miracle with in a large bowl. Add additional spices as desired. Mix well, cover tightly, and chill until serving. Slice baguette while waiting.


