From the moment Edwin and I saw this cake, we knew it was always our destiny to bake it.

And its creation had special meaning for me. I first learned of this cake a few months ago from mine and my husband’s friend Jeff. Jeff found the cake on Smitten Kitchen and demanded that we spend a day baking and gorging ourselves on it. He found out a few weeks after this that the cancer he’d had for two years was terminal, but he had such an incredible attitude that he just continued making plans for things he wanted to do, see and eat. Making this cake together remained on the top of his list.

young jeff, heather, morganold morgan, heather, jeff

Unfortunately things went down hill incredibly fast, and my husband, Morgan, and I were with Jeff when he died in mid-September. The three of us had been friends for a long time; he was the best man in our July wedding, one month before he found out he was terminal and two months before he died. I think there may always be a hole in our lives and in our hearts where he was.

Pouring the Batter

A few weeks ago Edwin sent me a link for this cake. I thought about the plans I had to make it with Jeff and I hesitated. Then I remembered how after Jeff’s death, at his request, we had thrown a celebration of his life where each of his friends either brought over a dish they had shared with him or some food that he loved. I realized that making this cake with Edwin was probably an excellent way to honor my friend and celebrate the things he loved most – food and friends.

Spreading Closeup

For the First Time on DINNERCAKES, Edwin and Heather Unite:

Thus, Edwin and I set a date and embarked on what we both knew would be a challenging journey. The elusive sour-cream chocolate cake with peanut butter frosting and chocolate-peanut butter glaze had been taunting us to bake it for quite a while.

The result – “This might be the best cake I’ve ever had,” crowed Edwin.

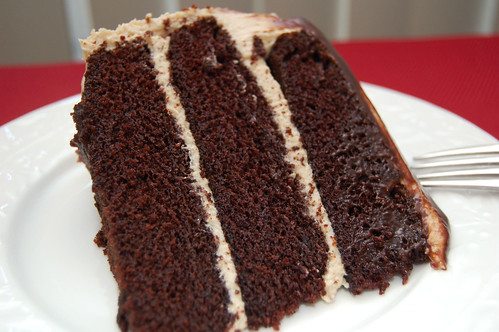
Even Morgan agreed, who can usually take or leave cakes. Nothing was overpowering about the cake, and although it may appear dense in photos, it’s actually very light and incredibly moist.

Chocolate Glaze Pour

However, it is extremely rich. A cold glass of milk is vital for the prevention of a sugar-induced coma. This beauty of a cake packs away 2 ½ cups of sugar in the cake batter and 5 cups of confectioners’ sugar in the frosting. If you have diabetes or a heart condition, this cake is not for you!

But now that all is said and done, our dream cake has been enjoyed and divvied up between us, and we’ve exceeded our sugar quota for the entire week, we can’t think of a better way to kick off Thanksgiving week and the holiday season than to share this amazing recipe.

Chocolate Peanut Butter Cake - So GoodThe First Cut - Chocolate Peanut Butter Cake

Edwin and I are thankful for good friends, good food and good times past and present. And I am thankful that, although I did not get to make this cake with Jeff, I was able to share so many other wonderful memories with him.

Hope this beautiful cake kick-starts your Monday! Happy Thanksgiving week from Dinnercakes!

Perfect Slice - Chocolate Peanut Butter Cake

Peanut Butter and Chocolate Triple Layer Cake
Sky High: Irresistible Triple-Layer Cakes
2 cups all-purpose flour
2 1/2 cups sugar
3/4 cup unsweetened cocoa powder, preferably Dutch process
2 teaspoons baking soda
1 teaspoon salt
1 cup neutral vegetable oil, such as canola, soybean or vegetable blend
1 cup sour cream
1 1/2 cups water
2 tablespoons distilled white vinegar
1 teaspoon vanilla extract
2 eggs

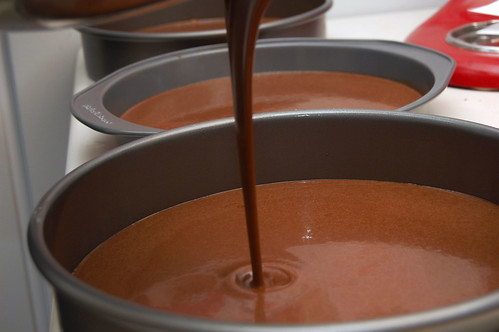
Preheat the oven to 350 degrees F. Butter the bottoms and sides of three 8-inch round cake pans (we used three 9-inch rounds so our cakes came out a little thinner). Cut three rounds of parchment paper to line the bottom of each pan; butter the parchment paper.

Sift flour, sugar, cocoa powder, baking soda, and salt into a large bowl. Whisk to combine. Add in oil and sour cream; whisk to blend. Beat in water gradually (we used a stand mixer, but you can also use a whisk). Add vinegar and vanilla. Beat in eggs until well blended. Scrape down the sides of the bowl to ensure batter is well-mixed. Divide evenly between 3 prepared pans.

Bake for 30 to 35 minutes, or until it passes the toothpick test. Cool in the pans for 10-20 minutes. Turnout onto wire racks, carefully peel off the paper liners, and firm them up in the freezer for 30 minutes.

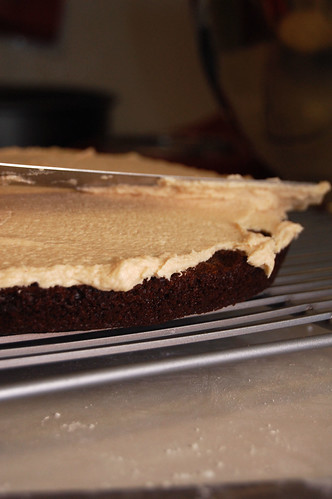
To frost, place one layer flat side up on a cake stand or serving plate. Spread Peanut Butter Frosting evenly on top, repeat with the next layer. Place the last layer on top and frost the entire cake with a thin layer of frosting – you are going to make a crumb coat; this part is crucial (a crumb coat keeps crumbs from showing up on your final layer of frosting).

Put the cake (with a thin layer of the peanut butter frosting all over) back in the freezer for 20 minutes. The frosting will now be somewhat firm on the cake, now you can use the remaining frosting to cover the entire cake, without a crummy mess! When fully frosted, you may want to chill again for 10 minutes.

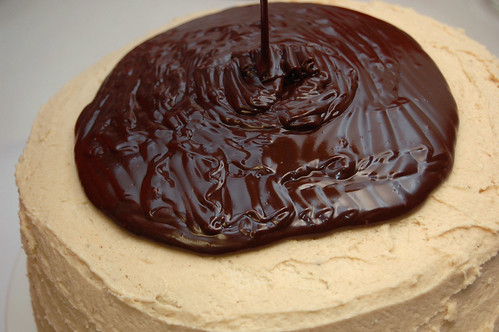
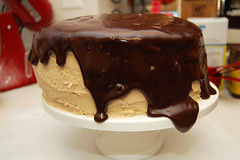
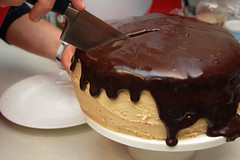
To decorate with the glaze, set the cake plate on a sheet of parchment paper to catch drips. Pour the glaze directly over the center of the cake, and using a spatula, spread it lightly over the top and to the edges so that it falls down the sides in large drips. To set the cake, you may want to refrigerate it again when you’re done. Edwin and I didn’t make it that far and instead we chowed down immediately.

Peanut Butter Frosting
1
0 ounces cream cheese, room temperature
1 stick (4 ounces) unsalted butter, room temperature
5 cups confectioners’ sugar, sifted
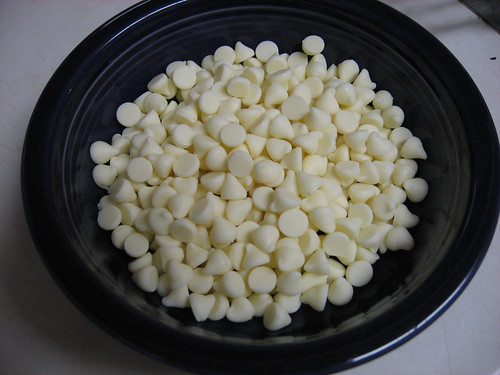
2/3 cup smooth peanut butter, preferably a commercial brand (because oil doesn’t separate out)

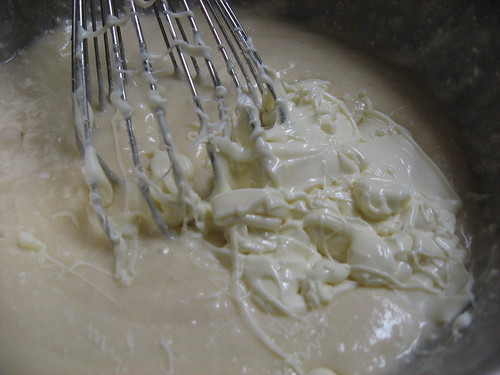
Beat the cream cheese, butter and peanut butter until light and fluffy in a large bowl with a mixer. Add the confectioners’ sugar gradually, mixing thoroughly and scraping down the sides of the bowl often. Continue to beat until blended, about 3 to 4 minutes.

Chocolate-Peanut Butter Glaze
8 ounces semi-sweet chocolate, coarsely chopped
3 tablespoons smooth peanut butter
2 tablespoons light corn syrup
1/2 cup half-and-half

I didn’t have a double boiler, so we used to the microwave method, heating for 15 seconds at a time and stirring after each 15 second interval. If you do have a double boiler or a metal bowl that you can set over simmering water, combine the chocolate, peanut butter, and corn syrup. Cook while whisking often until the chocolate is melted and the mixture is smooth. Last, remove from the heat, whisk in the half-and-half and beat until smooth. Pour over the cake while still warm.

Brigadeiro, A Sinfully Sweet Brazilian Candy

I had a friend in high school who moved to the United States from São Paulo, Brazil. One day after school, she took me back to her house and taught me how to make a deliciously sweet and simple Brazilian treat known as brigadeiro.

A brigadeiro is made using cocoa and condensed milk, a thick and sticky blend of milk and sugar that yields some of the most decadent and rich desserts I’ve ever had. It combines all the things that make my ideal candy – smooth, sweet, and full of unadulterated chocolate.

Brigadeiro, thickened - notice the bottom of the pan Brigadeiro, hardened mixture

My friend rolled her brigadeiro in chocolate sprinkles (the most common way) and placed each candy in a tiny paper wrapper. But you can get as creative as you like, incorporating any number of sumptuous outer coatings including coconut, pistachios, almond shavings, powdered sugar, more cocoa, etc.

I tried to make brigadeiro around this time last year and I failed. I lost the recipe my friend gave me (in my defense, it was almost 10 years ago), and I decided to follow a recipe I found online. I had also forgotten most of the instructions, which are actually pivotal in this recipe, and the recipe online gave little guidance.

After deciphering some “how-to” videos in Portuguese, I’m proud to say that I’m back in the brigadeiro-making ring. And just in time, too, because these are absolutely excellent to bring to any kind of holiday party.

Brigadeiro

Ghost Baker Suggests Holding the Butter:

The Portuguese videos I watched did not use 1 tablespoon of butter, something that many recipes I found online called for. Since my butter-free recipe worked very well and the experiments with butter did not, I did not include butter in the recipe below. If you think butter is a must, I’d love to hear it!

Enjoy, and good luck not eating them all in one day!

Brigadeiro, serving

Brigadeiro

1 can sweetened, condensed milk (15 oz)
3 tablespoons cocoa, sifted (I used Nestle, because they introduced cocoa powder)
Chocolate sprinkles (and/or coconut, nuts, etc.)

Heat 1 can of sweetened, condensed milk in a small pot on medium-low heat, stirring frequently. Sift in one tablespoon of cocoa at a time (I didn’t use a sifter this time because my sifter was MIA, and you can clearly see little deposits of cocoa in my photos. It still tastes great if you don’t sift it, but you may want to do it to achieve aesthetic perfection).

Use a wooden spoon to combine the cocoa into the condensed milk. Stir, stir and stir some more! Don’t stop stirring or else your chocolate could burn.

After about 5 minutes, you’ll notice the mixture getting thicker. You can tell that it’s done when, while stirring, you are able to see a good bit of the bottom of the pot (see my photos for an example).

Remove from the heat and pour onto a plate. Smooth the mixture out so that there’s a thin layer covering the entire surface. Set this aside, or if you can’t wait – set it in the fridge, for about 15 minutes. The mixture is ready when it’s completely cooled and hardened. Notice in my photo that I’m holding the plate at a 90 degree angle and the mixture hasn’t budged; you should be able to turn the mixture completely upside down without consequence (yep, just like they do Dairy Queen when you order a Blizzard).

In the meantime, ready your chosen toppings. I used chocolate sprinkles and coconut flakes and added these to two separate, small plates.

Using a spoon, scoop up about 1 tablespoon of your hardened mixture. It’s going to be very sticky! Using an additional spoon or very buttered and greased hands, drop it onto your topping and roll it until it’s completely covered and shaped like a ball. Continue scooping, dropping and rolling until you’ve used all your mixture. You may want to store these in mini paper cup wrappers; I just used a plate and covered it with saran wrap. You can try to share with others, but it’s hard!

Many Brazilians actually eat their brigadeiro just straight out of a bowl with a spoon. You can even use the mixture as a topping on ice cream or brownies. So really, you can’t go wrong!

The Cake That's Not A Cake – Pumpkin Cake with Honey Frosting

Well, this cake lied to me! It claimed to be a pumpkin cake with honey frosting, but soon after I began working on it I grew skeptical.

The batter was thick, even leveling it out in the pan was a little tricky. But as I tried my first bite it just seemed so familiar. I raced over to my recipe binder and began thumbing through the pumpkin recipes. It turns out this recipe is only one or two ingredients different from my favorite pumpkin BREAD recipe.

Pumpkin Loaf with Honey Frosting, Whisking

This really is a quick bread with frosting. It’s very heavy and dense, so make sure you serve it in small squares! This would actually be an amazing treat to have with your coffee in the morning and would serve that purpose much better than having it after dinner when you’re already full. In fact, I found some incredibly cute photos from someone who used the original Martha Stewart recipe to bake mini cupcakes. Bite size is the way to go here.

Ghost Baker Suggests Proceeding With Caution:

Beware the cook time. I used a square 8 inch pan because I don’t have a 9 inch, and I had a bit of a scare when I peeked into the oven at 55 minutes and the cake looked completely done. It had pulled away from the edges of the pan and was dark brown in the center and edges. I left it in for 5 more minutes but then became worried I was overcooking it. I did the knife test since I didn’t have any toothpicks, and it came out clean. But this time the knife lied to me. I poked at the center and it seemed a little squishy – it turns out the cake was like a pool that has a thick cover over it for the winter and I threw it back in the oven! To avoid this problem I would just try treating it like a bread and using a loaf pan (or, approximately 15 minutes for mini cupcakes and 25 for regular cupcakes).

Pumpkin Loaf with Honey Frosting, Leveling

I also used pumpkin cream cheese for the frosting instead of regular cream cheese. This gives the cake and the frosting some nice continuity, and it worked well with the honey.

And, woo hoo, you can make this recipe without any fancy gadgets – no stand mixers, food processors, pastry knives, etc. Dust off your whisk and wooden spoon!

Pumpkin Loaf with Honey Frosting, Chowing

Pumpkin Loaf with Honey Frosting
adapted from Martha Stewart
Prep: 25 minutes, Cook: Approx 1 hour and 20 minutes (when using a loaf pan)

CAKE INGREDIENTS
1/2 cup (1 stick) unsalted butter, melted, plus more for pan
2 1/2 cups all-purpose flour (spooned and leveled)
2 teaspoons baking soda
1/2 teaspoon salt
1 tablespoon pumpkin-pie spice (or 1 1/2 teaspoons cinnamon, 3/4 teaspoon ginger, 1/2 teaspoon nutmeg, and 1/8 teaspoon each allspice and cloves)
2 large eggs
1 1/2 cups sugar
1 can (15 ounces) solid-pack pumpkin puree

HONEY FROSTING
1/2 cup (1 stick) unsalted butter, very soft
1 bar (8 ounces) reduced fat pumpkin cream cheese, very soft (or you can use regular)
1/4 cup honey

Preheat oven to 350 degrees. Butter your loaf pan.

In a medium bowl, whisk together flour, baking soda, salt and pumpkin-pie spice. In a large bowl, whisk together eggs, sugar, butter (melted), and pumpkin puree until combined. Add the dry ingredients to pumpkin mixture and mix gently until smooth.

Turn batter into prepared pan and level the top using a thin spatula. Bake until a toothpick inserted in center comes out clean, approximately 1 hour and 20 minutes.

Cool for 10 minutes while in the pan, then turn out and cool completely (right side up) on a wire rack.

To make the honey frosting – In a medium bowl, whisk softened butter, softened pumpkin cream cheese and honey until smooth and pale orange. Spread over cooled pumpkin loaf. Cut loaf into sliced to serve.

*If you prefer to use a square 9 inch pan, decrease baking time to approximately 50 minutes.

Hints and Pinches, Fried Apples

Apples and Cinnamon

If you went apple picking this season like Edwin, then you may have a few extra apples in your kitchen. Apple pie is delicious, but many people don’t have the time to wrestle with dough and pie crust (and some don’t want to be tempted to eat a whole pie by themselves). Of course, this is sad for me because my favorite part is the crust! But most people, my husband included, just love the taste and smell of warm apples.

Apples and Cinnamon, Bag of Apples

This weekend my in-laws gave us a bag of leftover apples. The apples are on their way to going bad, and they’re really too mealy to eat by themselves. But Morgan’s father offered that he thought they would be perfect for frying – and he was right!

Apples and Cinnamon, Peeling and Slicing

Fried apples are difficult to get wrong, but you should decide how you want them before you start. I like a crispier apple, my husband likes mushy. I like my apples peeled and thinly sliced, and he prefers non-peeled chunks. We decided to experiment separately.

Apples and Cinnamon, Adding Spices


She said, Fried Apples (Crispy and Thin)

Apples and Cinnamon, with Cool Whip

I chose a medium size apple, washed and peeled it. Use an apple slicer to cut it into 8 pieces, removing the core. Use a small knife to make thinner slices.

Heat up a small skillet and add 2 tablespoons of butter when hot. After about 30 seconds, add the apple slices to the pan. Cook for about 2 minutes, stirring and turning the slices once or twice.

Sprinkle a dash of cinnamon, nutmeg, and brown sugar over the apples. Stir one or twice to coat both sides of the apples.

Remove immediately from heat so that they’re still crispy. Serve with a side of fat-free cool whip.

He said, Fried Apples (Mushy and Thick)

Apples and Cinnamon, Morgan's Apples

Morgan washed two medium size apples and used an apple slice to cut into 16 pieces total (skins on). He added butter to a hot skillet, and then included the apples.

After cooking for about 1 minute, add cinnamon, brown sugar (about 1/4 cup), nutmeg and allspice. Continue to cook the apples, stirring occasionally, for about 4-5 minutes.

Morgan served his fried apples without cool whip (a tragedy, it’s true).

Apples and Cinnamon, Morgan's Apples Served

Chocolate Pumpkin Cheesecake Brownies

Next week my husband is beginning a new career that he’s very excited about, and he asked me to bake something to take in to his office as he says his good byes. I sent him a few recipes to choose from, including 101 Cookbooks’ Amazing Black Bean Brownie Recipe that I’ve been dying to try, but Morgan wasn’t having any of it. He said he wouldn’t want them to think, “Who’s this crazy guy bringing in brownies made of beans? We’re glad he’s leaving!

Chocolate Pumpkin Cheesecake Brownies, Chopped Chocolate

Back to the drawing board!

I can’t really argue with him – office culture is not the most welcoming environment for exotic new recipes. In fact, people in general can be incredibly wary of trying new things (I should be looking in the mirror as I say this; I’m sure Morgan will be incredulous that I’m even suggesting that I’m outside this category).

Chocolate Pumpkin Cheesecake Brownies, Adding Cream Cheese to the Chocolate Batter

I remember a number of birthday parties growing up where my mom would amass enough food to feed an army, an assortment of all my favorite things including an amazing sherbert punch. But the sherbert punch contained a lot of different ingredients along with scoops of rainbow-flavored sherbert that would float to the top – this was clearly not Kool-Aid. And so the punch would go untouched. Hmpf, kids!

But I just couldn’t bring myself to make a chocolate chip cookie or basic brownie recipe this week. This week is different! Historic and amazing things have happened in my home state of Virginia and across the country. Electricity is in the air. If anything is possible, then maybe Morgan’s office will accept something ever so slightly off the beaten path?

Chocolate Pumpkin Cheesecake Brownies, Fresh out of the Oven

I kept coming back to two recipes: Chocolate-Pumpkin Brownies from RecipeGirl.com and Pumpkin Swirl Brownies from Smitten Kitchen (though I have to be honest, even I am almost pumpkined out for the season). The RecipeGirl brownies looked more chocolatey and had less pumpkin and pumpkin spices, and the Smitten Kitchen recipe looked great but Deb seemed a little unsatisfied. I decided to compromise and try to incorporate the best of both pumpkin brownie worlds.

Chocolate Pumpkin Cheesecake Brownies

Ghost Baker’s verdict and suggestions for an irresistible medley of chocolate and pumpkin:

Deb at Smitten Kitchen said she kept wishing her brownies were either all chocolate or all pumpkin and the RecipeGirl brownies looked more chocolate than pumpkin. I tried to change the recipes so that one taste might slightly overpower the other. Being that I love pumpkin, I added a whole can of pumpkin along with cloves and more nutmeg. Sometimes I think brownies run the risk of being a little bland, but adding the extra spices really kicked them up a bit. I liked them even better after they set overnight.


Deb also described her chocolate batter as being too thick. To smooth it out and make it more pourable I included 1/2 cup of cream cheese. It was certainly not as thin as the pumpkin batter, but it did help.

I also used a 13×9 pan to keep the brownies from being too enormous and thick.

Update – Success! Morgan said these brownies were scarfed down at his office in no time.

Chocolate Pumpkin Cheesecake Brownies, Chow Down

Chocolate Pumpkin Cheesecake Brownies

adapted from Smitten Kitchen and Recipe Girl

1 stick unsalted butter, room temperature

6 oz bittersweet chocolate, chopped

2 cups all-purpose flour

1 teaspoon baking powder

1/8 teaspoon cayenne

1/2 teaspoon salt

1 1/2 cups granulated sugar

4 large eggs

1 tablespoon pure vanilla extract

1 can solid-pack pumpkin

1/4 cup vegetable oil

1 teaspoon ground cinnamon

1/2 teaspoon ground nutmeg

1/2 teaspoon cloves

1/2 cup cream cheese, softened

Preheat your oven to 350 degrees. Grease a 13×9 baking pan and line the bottom and two sides with parchment paper. Grease the paper as well.

Melt chocolate and butter in a microwave safe bowl for 50 seconds; stir to incorporate fully.

Whisk together flour, baking powder, cayenne, and salt in a large bowl. Set aside. Combine sugar, eggs, and vanilla in the bowl of a stand mixer (or use a hand held mixer if you don’t have one). Beat until fluffy and pale yellow, approximately 3 minutes. Beat in flour mixture in two parts.

Pour half of your batter(about two cups) into a separate bowl and stir in the chocolate mixture. Add the softened cream cheese and stir unti combined.

In the other bowl, stir together pumpkin, oil, cinnamon, nutmeg and cloves.

Transfer half of your chocolate batter to the prepared pan and smooth and level with a rubber spatula. It will be relatively thin. Top with half of the pumpkin batter. Repeat with another layer of the chocolate batter followed by the last layer of pumpkin. You have to work relatively quickly to keep the batter from setting.

With a butter knife, marble your two batters – make sure you take the knife all the way down to the bottom of the pan.

Bake approximately 27-30 minutes. Let cool on wire rack, then remove brownies by lifting parchment paper and cool completely on your wire rack.

Makes about 36 brownies.

Red, White and Cupcakes

Happy Election Day! When I thought about what to cook on election day I kept thinking about hot wings and nachos. Unfortunately I seem to associate super bowl food with election food. Maybe it’s apt; I think it will be a battle! In any event I decided to settle for cupcakes.

White Cupcakes, White Chocolate Chips

There were probably several points in this recipe where I should have turned back and abandoned ship, but I had a dream of red, white and blue patriotic cupcakes in honor of election day. I wanted white cake, white icing, and a splash of colorful strawberries and blueberries.

White Cupcakes, Adding White Chocolate to the Batter

While searching for a white cake recipe in my cookbooks, I was surprised to find that I actually owned a book completely about cupcakes called Cupcakes: From the Cake Mix Doctor by Anne Byrn. I knew that using this book would go against one of Edwin’s core values (thou shalt not use box cake mix), but because I was in a pinch for time and I enjoy thwarting Edwin, I went for it.

White Cupcakes, Ice Cream Scoop - Gift from my Friends for my Bridal Shower

Flipping through the first few chapters I found some neat suggestions including 5 ways to fill a cupcake. One of the suggestions is to place a large berry on top of the batter before baking – fitting nicely with my theme of berries and white cake. I also wanted to trim at least a little fat from this recipe, so I decided to top off the cakes with a dollop of fat free cool whip instead of buttercream frosting – something like mini strawberry and blueberry shortcakes. Unfortunately for me the grocery store had other ideas, and they weren’t carrying very impressive blueberries. But blackberries are just as good, if not better, right?

White Cupcakes, Blackberries

In addition to box cake mix (sorry, Edwin), the batter called for other ingredients such as milk, oil, eggs, vanilla, and white chocolate chips. The white chocolate chips sounded amazing to me as an addition to the batter, but they gave me trouble. I had to work quickly and make sure not to let the melted white chocolate sit, because after only a minute the smooth mixture hardened into large chunks.

White Cupcakes, Use Smaller Slices

Adding a berry to the top of the batter before baking was also problematic. I tried it a few different ways, sometimes hiding a thin slice of strawberry or a blackberry inside the batter and sometimes leaving it on top. The cupcakes with strawberry slices had to cook for an even longer time than the blackberry cakes – approximately 22 minutes. The cook time for all of the cupcakes was a little tricky, and on my very first batch a few of the cakes just completely sunk in the middle.

White Cupcakes, Complete

Ghost Baker’s Tips to Avoid Trouble at the Polls:

Work quickly to avoid having your white chocolate harden and ruin your batter. Make sure it’s fully incorporated into the batter. If you’d like to add a berry filling, stick to either small blueberries or blackberries or just a half berry. Set it gently on top of the leveled batter right before it goes in the oven. Adjust your cook time as needed, but make sure the area around the berry slightly springs back when you touch it lightly after taking it out of the oven. Make sure there are no pockets of uncooked batter.

Red, White and Cupcakes with Berry Filling
adapted from White on White Cupcakes in
Cupcakes: From the Cake Mix Doctor

24 Paper Liners for cupcake pans
1 cup white chocolate chips
1 package white cake mix, extra moist
1 cup milk
1/3 cup vegetable oil
1 large egg
3 large egg whites
1 teaspoon vanilla extract
1 cup blueberries or blackberries (approximately)
1 container of cool whip for frosting

Preheat the oven to 350 and line°F and line your cupcake pans. Set aside.

Place the white chocolate chips in a microwave safe bowl. Microwave on high for 50 seconds. Remove the bowl from the microwave and stir with a rubber spatula until the chips are smooth. Set aside.

Mix cake mix, milk, oil, egg, egg whites, vanilla, and melted white chocolate in a large mixing bowl. Blend with a stand mixer or electric mixer on low for 1 minute, then medium for 2 more minutes.

Using an ice cream scoop or 1/4 measuring cup, scoop batter into your lined cups, filling it approximately two thirds of the way. Level your mix with a spoon. Lay a small berry or half a berry in the center of each cake; do not push down.

Bake approximately 22 minutes, checking after 20 minutes to make sure your cakes don’t burn. They should be light golden brown and slightly firm to the touch. The batter surrounding the berry should not be runny.

Cool for 15 minutes, then top with a dollop of cool whip and decorate with berries as desired.

It's Not The Recipe, It's the Art… Sorta

A few weeks back a friend and I went to Homestead Farm in Maryland for apple picking. I’m a huge (read: obsessed) fan of apples, going through a minimum of two a day, however this was my first time picking. Needless to say I went a little overboard and ended up with a 28 pound bag of Cameos, Pink Ladys (best. apple. ever.) and Sun Fujis.

Now, 28 pounds is a lot of apples; stretching the limits of my fridge’s storage capacity (and my roommate’s patience with my obsession for food), so I decided to take full advantage of this by going into apple cooking/baking overload. We’re talking apple crisp, baked apples, apple honey challah bread, apple tarts…. These all had… varying levels of success.

One of the things I have never done is a pie. My mom makes awesome pies. Growing up she’d always do at least two pies: one cherry for my sister and one apple for me (no, we didn’t eat the entire pie ourselves). I friggin’ loved those pies. So what better way to learn how to bake a pie than via the mom? So I took a trip down to Richmond Saturday to learn the art of pie making (and to make a potato gun with the dad, but that’s another story).

Cinnamon Apples

One of the big things mom stressed was “reading the dough.” According to her, you have to be able to vary the recipe based on how things turn out. Maybe it’s a dry day and therefore the dough is dry, or maybe the opposite. Or maybe things just aren’t coming together, so you have to improvise.

Mixing the Dough

My mom uses a very simple recipe for pie crust; one she apparently got off a Crisco box (as a piece of the food snob in me dies to hear this). The apple pie filling? I have no idea.

Apple Pie

Mom’s Apple Pie (with help from Crisco)

Ingredients:
Crust:
– 1 1/3 cups of flour
– 1/2 cup of shortening
– 3-5 Tbsp of water
Filling:
– 2 pounds of baking apples (I’m a fan of granny smith)
– 1/2 cup granulated (white) sugar
– 1/2 cup light brown sugar
– juice from half a lemon

Make the filling:
Peel and core the apples, cutting them in half then slicing them further; eight to twelve per apple. Combine the apples, lemon juice, white and brown sugar until apples are thoroughly coated. Let sit.

Make the crust:
Preheat the oven to 400°F and put a rack in the middle.

Put the flour in a large mixing bowl and “cut” the shortening into the flour – meaning, cut the shortening into chunks instead of just dumping the whole slab in the bowl. Then using either a pastry blender or just some butter knives, cut into the butter until you get it a mealy consistency. Something like coarse cornmeal.

Add the water one tablespoon at a time and get dirty. Mix the dough in your hand(s) until the dough is a bit tacky and sticks together. If too sticky, add flour. If not sticky enough (i.e., falling apart), add more shortening. If too dry, add water. Ask yourself what will happen if you try to roll this dough out and how it’s going to cooperate.

After you’ve “read” your perfect (::cough::) pie crust, divide it into two halves. Lightly flour a clean surface and roll out the dough. There’s a bit of flexibility on how thick you want this – basically, go for a diameter and two inches larger than the diameter of your pie pan (8-10 inches suggested for pan sizes). It’s better to have a crust that’s too large than too small. Roll from the center out, trying to get a uniform circle shape. The thickness doesn’t matter so much as the diameter.

Carefully take your rolled out dough and transfer it to your pie pan. If it’s sticking too much make a mental note of this for next time, and use a pastry cutter as a quasi-spatula to separate it from your work surface. After this, fill your pie with the filling and repeat with the second half of dough. Make a few holes in the top of the pie crust for heat to escape.

Put your pie in the oven and cook for 45 minutes. Remove when the crust is golden brown.