Kitchen Tips – How to Save your Burned Pots!

My husband Morgan and I were given a wonderful set of stainless steel Calphalon cookware as a wedding present. The pots and pans are amazing and we use them exclusively.

So my heart may have momentarily stopped when Morgan, while trying to steam vegetables but with too little water in the pot, burned the bottom of our 6 quart spaghetti pot completely black!

I assumed that the pot was ruined. He tried a few small things but nothing seemed to help.

Then he found an amazing how-to guide on How to Treat Burned Pots and Pans. It was Step 4 that really made the difference:

“If burned areas still remain, cover them completely with a generous amount of baking soda. Drizzle in just enough water to create a thick paste, smearing the paste up the sides of the pot if needed. Set aside for at least 4 hours, preferably overnight.”

And now? The pot now looks brand new! All the black that was at the bottom is completely gone. So if you or your significant other burns a pot – relax! The ehow.com steps work.

Heather and Jane’s birthday party this past Saturday was a blast. There were friends, music, drinks, games and oh-so-much food. The latter has to be expected when one of us is involved. There was mac & cheese, chips, beans, veggies, cakes… enough food to last a lifetime. I offered to help Heather with the food prep because it’s very easy to get in over your head with that sort of thing. Plus, hey, it’s an excuse to cook something.

Chopped Red Peppers

I made hummus before and I really enjoyed the results, so I decided to try a variation with fire roasted red bell peppers. Now I was going to post that recipe today, but then it occurred to me that there might be some readers out there that don’t know how to fire roast red bell peppers. So instead, we’ll go, step by step, this process.

Charred Red Peppers

Option 1 – Open Flame
The easiest way to fire roast red bell peppers is with an open flame, whether it be a grill or a gas stove. Simply place it above so the flames lick the bell pepper and rotate as the skin chars. You really want a lot of charring. It doesn’t need to be completely black, but too little char = peeling difficulty (and sadness). Then place in plastic bag. By putting it an air tight container while it cools, the steaming action will make it easy to remove the skin. Let sit for 30 minutes and peel off the skin with your hands. Then core and seed as usual.

Uneven Charring

Option 2 – Oven
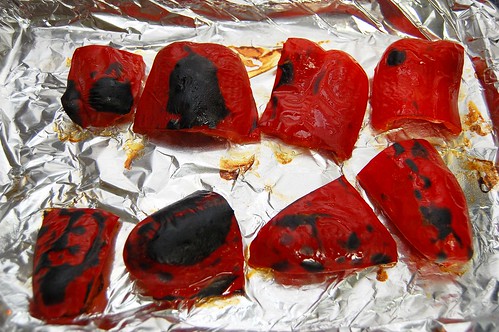
Some people don’t have a gas stove or grill, but they can always fall back to their oven. Chances are, if you’re fire roasting a bell pepper you’re going to puree, dice, or do some kind of significant cutting to the pepper. Because of this I recommend cutting the bell pepper into eighth; coring and seeding it as you go. This will make it easier to seed as well as ensure that all the pepper is being charred. In addition, ovens often don’t char as evenly (see above) and an under-charred pepper is incredibly frustrating to peel. Set the peppers on a baking sheet on the top rack of your oven and broil, removing pieces as they become charred. No time guidelines here. Just keep a watchful eye!. Then, just like in option 1, remove from the heat and seal in plastic. After 30 minutes, remove and peel off the skin. Enjoy!

Steaming To Peel

Kitchen Tips: How Grills Heat

Ah, the wonders of summer and the great weather it brings. This weekend is looking pretty good and with good weather comes grilling. But did you ever stop to wonder how grilling works? How it cooks your food? (No? Well, see you Monday then!) How your delicious burger is born in fire?!?!?! Well, wonder no more!

Whether it be charcoal or gas, a grill cooks your food with three kinds of heat transference: conduction, convection and radiant heat. Conduction is your most straight forward. Science 101 states that heat makes molecules move faster. The faster they move, the more often they bump into other molecules, transferring heat to them. This is called conduction. Your metal grating in your grill that you rest the food on is a great conductor; heat transfers through it all very quickly. Your food, however, is not such a great conductor. This is why you always preheat you grill. That initial contact of meat with metal is a burst of energy, forcing heat in deeply and quickly. The outside of the meat continues to receive most of the heat, passing it slowly inside. This is why you can have a steak with a thick crust and a rare interior (mmmm).

Convection is the transfer of heat through the air, but in a special way. The heating of he air molecules in a closed girl causes air circulation. As the molecules heat, they rise, cooking the meat and forcing the colder molecules down to be heated by the fire. This rotation of air is not a primary method of cooking, but it does account for part of it; especially in indirect grilling.

Radiant heat is your tricky one. This heat actually never touches the food. (crazy, right?) It’s infrared energy. Think about the sun and how it can still warm you on a cold day. It’s not heating you through conduction because the air around you is still cold, and yet warmth it’s providing.

So in short, the flow of heat from the the fire to the meat is radiant heat, the heating of the grating (and then the direct heating of the meat) is conduction and the heating of the surface of the meat is a combination of conduction, radiant heat and convection. Got it? Happy grilling!

Kitchen Tips – Simple Tricks for Fussy Palates

As you all well know, I can sometimes be a veggie-phobe. Yet for some reason as the sun comes out and the temperature rises, even I can be tempted.

Last Friday me and my husband, Chef Edwin and his lady friend and some bake-a-thon alums got together at Edwin’s for a happy hour cook-out.

meatballs

You would never, ever catch me putting raw onion slices or green pepper on my burger, but if you dice it and roll it into the patty, I’m sold. Though I still ate way too much food at the cook-out, with some veggies in the patties at least I did sneak in more vegetables than usual!

I’ve been told that most people aren’t like me in that they actual revel in eating fresh vegetables, but if you know and love a fussy eater (spouse, significant other, child, etc.), consider add vegetables to your patties. Dicing veggies to a small size will work best. This will also work well for meatballs.

Kitchen Tips: What is Brining?

So it occurred to me recently that a lot of my Kitchen Tips have been more relevant to meat than veggies. Oh well, culinary terms are good for you. However, if you’ve got any questions you’d like answered in the vegetarian subject area, let us know.

Brining is the process of immersing a meat in a brine for anywhere from a few hours to two days; resulting in it becoming significantly juicier. A brine is a solution of liquid with a significant amount of salt; usually 3% to 6%. Brining does three things. First it breaks down the muscles a bit; making it more tender (brining is often considered a type or marinating). Second, the salt interacts with the proteins in the meat, giving them a higher water holding capacity. Third, it absorbs any herbs or spices that may be in the brine very well.

So, basically, when done correctly you have the potential for a very tender, very juicy, very flavorful meat. This has great potential for turkey, a type of meat that many consider very dry. Simply Recipes has a great recipe for brined chicken that I’ve tried and loved. Give it a shot some time.

Kitchen Tips – Egg Whites Only

Edwin and I hope you’re enjoying the new site design that we unveiled this week! Coming to a clean and simplified site makes me feel all warm and fuzzy… it’s like having a freshly cleaned room!

In addition to the new design, we’re also trying out some posting changes. Kitchen Tips will be posted on Fridays, and Saturdays will be a day of rest for now. This is for a few reasons, but mostly because we thought you all might enjoy greater variety of content throughout the week. Like most things on DinnerCakes, this change is certainly open to debate – so please tell us if we’re way off base!

Now on to the Tips!

When you grow up around someone who cooks, you don’t always realize how much you’ve picked up just by observing.

I was recently helping a friend who was making a cake for her boyfriend’s mom’s birthday. The recipe called for some whole eggs (egg yolk and egg white) and then a few whites only. I was surprised when she was unsure how to separate the egg white from the yolk, aside from just breaking all the eggs into a bowl and then fishing the yolks out.

It takes a little practice, but it’s just a careful dance of cracking open the egg and letting the egg white run down as you pass the yolk back and forth between the two halves of shell. This would probably make a good tutorial video (if we had video tutorial capability… I’ll tuck this away in the back of my mind!), but I hope these photos help make a little sense of it.

eggs7eggs6

Crack the egg in the middle.

eggs4eggs3

Carefully pour the yolk back and forth, letting the egg white run down.

eggs2eggs1

Kitchen Tips – How to Avoid Green Speckled Carrot Cake!

Happy Saturday, DinnerCakes readers!

Today’s Kitchen Tip I learned just a few weeks ago at a cook-out. I got into a discussion about baking with the wife of one of my husband’s friends. She told me a great story about carrot cake!

She and her husband had another couple over for dinner, and she unwrapped her freshly baked carrot cake to get it ready for serving. She cut into it and noticed that there were green flecks throughout the cake! She knew it couldn’t be mold because she had just made it. One of the dinner guests thought she had put some zucchini in the cake.

Yikes! How many of you would have died from embarrassment like she felt?

It turns out that the only thing she did differently this time as opposed to in previous cakes was that she left on the outer layer of the carrot. She washed it of course, but she included the whole carrot rather than removing that top layer.

I did some googling and it looks like she’s not alone. Quite a few people have suffered the green speckled carrot cake phenomena. I can’t pinpoint exactly why, though. Some sites get extremely technical talking about the oxidation of the carrots. Other possible explanations I found were that sometimes if carrots are pushed above the soil when growing, the sun may turn them greenish, and that overbaking could also make them yellowish.

The bottom line is that you should peel off the outer carrot skin to be safe, and watch your cake to make sure that you don’t overbake it. If anyone comes across a more definitive explanation (in layman’s terms!) please let us know!

It occured to be a few days after posting my last Kitchen Tips that chocolate would have been a great topic to go with the easter theme. Alas, hindsight. Today we’ll talk a little about chocolate and the ways to classify it. Below are some of the most common types of chocolate.

Milk Chocolate is the only chocolate with milk solids and also contains a large amount of sugar (usually 50%). These two together often outweigh the actual amount of cocoa, so it tends to be softer than most. This is the mildest of the chocolates and can be eaten out of hand or used in cooking. To be classified as milk chocolate in the United States, it must contain at least 10% cocoa.

Dark Chocolate is chocolate with no milk solids added. Because it’s not competing with milk solids, it has a more intense chocolate flavor. This also means it’s dryer and has a more noticable bitter aftertaste. Sweet, semisweet and bittersweet should be considered types of dark chocolate (none of these contain milk solids additives). It’s worth noting, though, that the United States has no official requirements for the label “dark chocolate.”

  • Sweet chocolate is the sweetest of the dark chocolates. The United States requires all sweet chocolate to have at least 15% cocoa but says nothing on the amount of sugar. Traditionally, the amount of sugar is around 60%. 
  • The difference between bittersweet and semisweet is a bit blurry. Semisweet chocolate should be between bittersweet and semisweet on the sweetness scale, but there is no requirements on distinguising them. Both require 35% cocoa and the sugar usually ranges between 30-50%. Often, semisweet is considered to have half the amount of sugar as sweet, putting it at 30%. 

Unsweeted Chocolate is your “purest” chocolate, also known as bitter or baking chocolate. It contains no addition of sugar, cocoa butter or milk solids. Keep in mind that there is cocoa butter in it naturally; usually 50-55%. Due to it’s strong, bitter taste, this chocolate is never eaten just out of hand.

White Chocolate is not chocolate at all, as it contains no cocoa. It was invented in Switzerland in the 1930s and is made from purified, usually deodorized cocoa butter, milk and sugar. It tastes very little like chocolate

Kitchen Tips – Don't Warp Your Pots and Pans!

My first year out of college was also my first year in law school. I didn’t have a lot of extra time (or sanity), so I frequently made breakfast for dinner. Eggs and pancakes kept me going through the long and lonely nights!

It was also during this time that I realized if I immediately ran the pan under cold water after removing my eggs, I could save oodles of time on clean up. The egg residue wouldn’t cling to the sides of the pan, and I wouldn’t have to do any scrubbing (or, more likely, I wouldn’t have to watch the pans stack up in the sink until I ran out of room to turn the faucet on).

I also quickly realized that drastic temperature changes, like moving a very hot pot or pan immediately from the stove to cold water, is an excellent way to warp it. D’oh!

Pots and pans are expensive. Learning how to care for your cookware and utensils (I’m sure we’ll get to caring for utensils in a future Kitchen Tips post) can save you a lot of time and money in the long run. Here’s a great article from About.com called 10 Ways to Ruin a Nonstick Pan.

Also, be sure to read the packaging when you first buy a pot or pan; certain makes and models will have specific instructions – copper bottom cookware, stainless steel and clay or enamel cookware all have slightly different quirks.

Good luck!

Kitchen Tips: What Is Marinating?

Marinating does two things: enhances flavor and tenderizes food. It can be applied to just about any type of food: meat, poulty, fish and even vegetables. The goal is for soak/immerse the food in your marinate for a time, allowing the food to absorb the oils, sugars etc. On top of this, if your marinade contains an acidic component, this will break down your food.

Marinating times vary, but be careful not too marinate too long or your food will become stringy or mushy; especially with tender foods. Always check the instructions/recipe, but a good rule of thumb is 2-3 hours for cubed meats and 12-24 hours for whole pieces ranging from 5 to 10 pounds. Always refrigerate while marinating and if working with non-vegetarian items never reuse your marinade that wasn’t cooked.