How To Make Excellent Baklava Without Disaster

We had a reader request not too long ago for some guidance on how to make the Turkish dessert Baklava. The complexity lies in the use of phyllo dough, paper thin sheets of flour that are stacked atop each other to form the bulk this dish’s culinary mass. Countless adventurous bakers have undertaken the task of making Baklava, only to be met with frustration as sheet after sheet of phyllo dough tears and falls apart.

Aww Nuts Mmm Filling

The problem with phyllo dough is that it dries very, very quickly. Fresh out of its package phyllo dough is delicate, but certainly not fragile. The trick, then, is to take that window of not-dry opportunity and stretch it as far as possible (and working effectively in that window of course).

Keep Phyllo From Drying Baklava Ready For The Oven

The first thing you want to do is prepare a large clean area to work with. You want a spot for your phyllo dough, your baking pan, two bowls of filling and a bowl of melted butter with brush. Give yourself a little breathing room so you’re not bumping one thing into another, especially around the phyllo sheets. Feel free to move the fillings aside, as they will be used the least often.

Baklava Baklava Close Up

Any questions?

Baklava Awesomeness
1 lb phyllo dough

Filling 1
3 cups crushed nuts (walnut, almonds, pistachio, or any combination)

Filling 2
1/4 cup sugar
1 teaspoon cinnamon
3 teaspoons lemon zest
1/4 teaspoon nutmeg

Syrup
1 1/2 cup water
1/3 cup honey
1 1/2 cup sugar
1/4 brown sugar
1 tablespoon lemon juice

Preheat your oven to 325° and grease a 9 inch baking pan. Be sure to grease it well, as baklava will tear or separate easily.

Divy your phyllo dough into two stacks/portions and put one stack in the fridge, sealed. Place a sheet of plastic wrap on your work space and place the non-refrigerated sheets on top. Place another sheet of plastic wrap on top followed by a damp towel. As you are working you will fold back the towel and top layer of plastic, remove the sheets you need, re-cover with the towel and plastic, repeat. This will slow the drying process. Work smoothly, efficiently, but calmly. If you’re feeling rushed you’re either working too fast or you need a Zanax. : – P If you get a little tearing here and there, don’t fret. When you’ve used all the dough from one stack, move on to the other.

Place two sheets of phyllo dough into your pan and lightly brush butter on top. Place another two on top of these two and butter again. Repeat until you have a total of eight sheets in your pan. Sprinkle half of each of your fillings atop, distributing evenly as possible. Begin placing more phyllo sheets, just as before until you have another eight sheets added. Sprinkle the rest of your remaining filling and continue placing the remaining phyllo sheets as before.

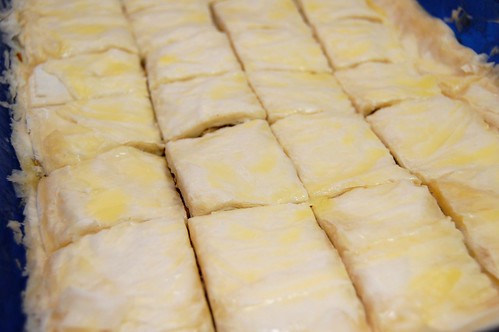
Take a sharp serrated knife (so it doesn’t crush or pull on the sheets) and cut into small 1-2 inch squares, but don’t cut quite all the way through (just eyeball it). My sister claims this helps your syrup absorb better.

Bake for 35 minutes, reduce to 300° and bake for another 45-60 minutes, until golden brown. While baking, throw all your syrup ingredients into a saucepan, bring to a soft boil, then simmer for 15 minutes. Set aside. When baklava is ready, remove from oven and immediately pour your syrup evenly over the baklava. Let cool completely (this will take several hours. torture). Complete the square cuts and serve cold or rewarmed. Enjoy.

Pop quiz: what ingredient do you use most often?  Onions?  Pasta?  Salt?  I have a feeling it’s probably oil; olive, peanut, take your pick.  There is rarely a recipe in one’s repertoire that doesn’t pair heat with oil (I suppose baking is the most notable excepting with butter taking the crown).  Oh, oil, how we love you.

Working with cooking oil isn’t a particularly complex area of the cooking process.  Sautéing, roasting; it’s all just lubrication with a subtle touch of taste.  I do feel a little constrained at times when I want to do something with finer control.  Ever see those purtty photographs of soup with the broken circle of oil on top?  Or maybe you just want to throw some veggies on a baking pan, coat them a little and roast.  I have a difficult time getting an even spread with the bottle it comes in (especially if it’s a large one), so I moved my olive oil to a squeeze bottle.  The smaller spout and squeeze-ness (technical term, for reals) allows me much more control.

I used a frosting bottle leftover from a Drop In & Decorate event I hosted, but any kind would work; one of those condiment bottles you’d find at most restaurants, for example.  Just be sure there’s a tight seal or you’ll find yourself with an oily mess.  Of course, there’s also dressing bottles, but I prefer to use that just for my really good olive oil.

Deglazing 101 – Little Pieces That Pack A Punch

On Monday I briefly mentioned deglazing, but I didn’t really talk about what it was or why you’d do it.  Deglazing is a technique for removing dried, burnt bits of food from the bottom of a pot or pan.  The process is fairly simple.  You take a small amount of liquid (half a cup or more) to the pan while it’s still hot to boil those pieces off along with scraping with a metal or wooden utensil.  Eventually you’ll be left with a dark, somewhat thick “juice” and a slightly cleaner pan.

This may seem a bit odd for someone who’s never heard of it.  Ordinarily, we associate burning with bad taste and something to be avoided.  Deglazing, however, has the effect of extracting strong flavor from this otherwise-useless cooking by-product.  They often serve as the foundation for gravies and pan sauces; a thinner kind of sauce (those bits are often called “fonds”, French for “base” or “foundation”).  They can add a stronger presence of flavor richness.

Deglazing is often done after sauteing or searing beef or chicken in non-non-stick pan (is there a better way to say that?).  You can’t really get much deglazing with non-stick, unfortunately, or it wouldn’t really be doing its job.  Next time you’re watching a cooking show, check out the hardware.  Many chefs value this culinary ambrosia and therefore prefer non-stick.  Roasting pans are also excellent candidates for this, albeit a bit more difficult to work with.  Any liquid can be used, though the most common choices are water, stock and wine.  Of course, if the liquid has flavor it will effect the end result of your sauce base, so take a moment before making your decision.  Often, for example, you’ll see red wine being used with beef-based dishes.

So, next time you’re looking down at a blacked pan in disgust, remember the power of deglazing!

Heather and Jane’s birthday party this past Saturday was a blast. There were friends, music, drinks, games and oh-so-much food. The latter has to be expected when one of us is involved. There was mac & cheese, chips, beans, veggies, cakes… enough food to last a lifetime. I offered to help Heather with the food prep because it’s very easy to get in over your head with that sort of thing. Plus, hey, it’s an excuse to cook something.

Chopped Red Peppers

I made hummus before and I really enjoyed the results, so I decided to try a variation with fire roasted red bell peppers. Now I was going to post that recipe today, but then it occurred to me that there might be some readers out there that don’t know how to fire roast red bell peppers. So instead, we’ll go, step by step, this process.

Charred Red Peppers

Option 1 – Open Flame
The easiest way to fire roast red bell peppers is with an open flame, whether it be a grill or a gas stove. Simply place it above so the flames lick the bell pepper and rotate as the skin chars. You really want a lot of charring. It doesn’t need to be completely black, but too little char = peeling difficulty (and sadness). Then place in plastic bag. By putting it an air tight container while it cools, the steaming action will make it easy to remove the skin. Let sit for 30 minutes and peel off the skin with your hands. Then core and seed as usual.

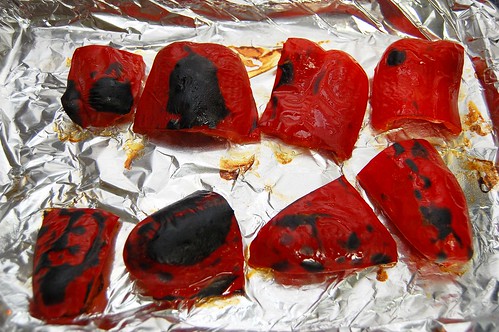
Uneven Charring

Option 2 – Oven
Some people don’t have a gas stove or grill, but they can always fall back to their oven. Chances are, if you’re fire roasting a bell pepper you’re going to puree, dice, or do some kind of significant cutting to the pepper. Because of this I recommend cutting the bell pepper into eighth; coring and seeding it as you go. This will make it easier to seed as well as ensure that all the pepper is being charred. In addition, ovens often don’t char as evenly (see above) and an under-charred pepper is incredibly frustrating to peel. Set the peppers on a baking sheet on the top rack of your oven and broil, removing pieces as they become charred. No time guidelines here. Just keep a watchful eye!. Then, just like in option 1, remove from the heat and seal in plastic. After 30 minutes, remove and peel off the skin. Enjoy!

Steaming To Peel